Monday, October 24, 2022

Forever Fern & Forever Flourishing Wedding!

My nephew got married last month!!!  He is the first of our nieces & nephews to get married, and it was so much fun to be there to celebrate him and his new bride!  They are one cute couple!  What does that have to do with stamping?!  Why...I made them a wedding card!  And I wanted to share!  Hee.  I took the inspiration from their wedding announcement, actually.  It was a white card with green foliage on the top and bottom and then the info in the middle.  It was gorgeous...so that's what I went with!


Colors Granny Apple Green, Soft Sea Foam, Evening Evergreen, Basic White, Gold
Inks:  Granny Apple Green, Soft Sea Foam, Evening Evergreen, VersaMark
Cardstock/Papers: Basic White, Thick Basic White, Evening Evergreen, Vellum
Stamps: Forever Fern
Tools:  Forever Flourishing Dies, Timber 3D Embossing Folder, Brick & Mortar 3D Embossing Folding, Heat Tool
Accessories: Linen Thread, Metallics Embossing Powders, Iridescent Rhinestones Basic Jewels

The Forever Fern Stamp Set & Forever Flourishing Dies are a match made in heaven...just like my nephew & his new bride!  Hee.  

(Note: the stamp set & dies are technically a bundle, just not sold as such since they were sold as one in the last catalog!)  I didn't use any of the dies to cut out the stamped images .. because that was not the look I was going for with this ... but I did use one of the Flourish Dies to add some fun detail behind the sentiment.  


(And I really do hope they have "love & laughter forever after" in their marriage!  😍  I really love this sentiment for a wedding.

I just have to say...I really like how the layered stamping in the different greens worked out for this card.  Also have a layered embossing look.  The stamped panel was embossed with the Timber 3D Embossing Folder.  And the background layer was embossed with the Brick & Mortar 3D Embossing Folder.  😍


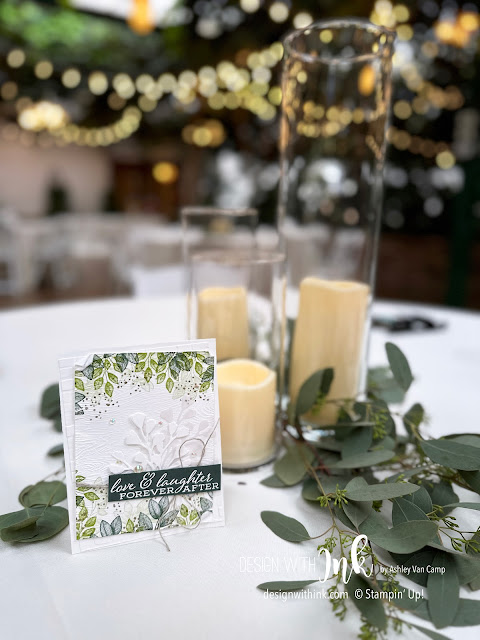
Then look at this!  I may be a nerd and took a picture of the card at the wedding.  Haha.  With the centerpieces!  (And that background!  It was a GORGEOUS reception place!). I think it matches quite well with it all.  Haha.  Thank heavens I hadn't sealed the envelope yet so I could be a dork like this!  Hee.


I hope you enjoyed this card!  And you were inspired to be creative in some way!  Creative is so important for our brains so do something creative today!  💗


And here is a picture of the happy couple! Aren't they adorable?!  😍


Please let me know if you have any questions!  Would love to help you with any of your papercrafting needs.  And if you need any help getting any Stampin' Up! supplies...please let me know!  Would be happy to help there also!  

Thank you for visiting!
Contact: designwithink@gmail.com

Friday, October 21, 2022

Silhouette Hello! for TGIF Challenge 391!

It is a fun inspiration challenge this week over on the TGIF Challenge Blog!  Come play along with me and the rest of the design team!  First up is the card I made for the inspirational challenge and then I will show you the actual inspiration!

Colors Polished Pink, Coastal Cabana, Pale Papaya, Gold, White, Black
Inks:  Polished Pink, Coastal Cabana, Pale Papaya, VersaMark, BLENDS: Light Polished Pink
Cardstock/Papers: Basic White, Basic Black, Gold Foil Sheets
Stamps: Simply Fabulous
Tools:  Palms Dies, Scary Silhouettes Dies, Timeworn Type 3D Embossing Folder, Blending Brush, Water Painter
Accessories: For Everything Fancy Sequins, White 1/4" Crinkled Seam Binding Ribbon, Metallics Embossing Powders

What do you think?!  What could the inspiration be for this challenge?!  Well...here you go!  Take this photo and take it where you will!  SO many places you could go with it!  I used the silhouette layout with a frame for my card!  And it was so much fun!  What are you thinking you will do?! 


Here are a few more photos of my card to show you some details!!   I used a few die sets for this card.  The frame and background piece were die cut with the Scary Silhouette Dies & the palm trees were cut with the Palms Dies.  Both are must have die sets, if I'm being honest.  Haha. 


I love the greeting...it is embossed with gold embossing powder and I just love the shiny "puffy" look it gives! Here are a few views from it! 


And if you are wondering what that fun pink ribbon is...why it is the White 1/4" Crinkled Seam Binding Ribbon!!!  I have quite a few rolls of this on hand all the time...because it is so easy to just color it with a Blends Marker to have any color ribbon that you want!  I used the Light Polished Pink Blends Marker for this!  😍😍😍

One last look at the whole card:


What do you think?!  I hope this gets you inspired to go create something!  Then head on over to the TGIF Challenge Blog to see what the other designers have made this week & play along with us!  

Thank you so much for visiting!  I can't wait to see what you make! 

Contact: designwithink@gmail.com

Thursday, October 13, 2022

Sweetest Cherries Birthday!

 Just a quick birthday card with the cutest bundle...the Sweetest Cherries Bundle!! 

Colors Polished Pink, Parakeet Party, Soft Suede, Pool Party
Inks:  Polished Pink, Parakeet Party, Pool Party, Tuxedo Black Memento Ink Pad
Cardstock/Papers: Basic White, Pool Party, Parakeet Party, Soft Suede
Stamps: Sweetest Cherries
Tools:  Cherry Builder Punch
Accessories: Baker's Twine Essentials Pack, 2021-2023 In Color Opal Rounds

I love these Polished Pink cherries so much!  I stamped the hashmark background and then just added the stamped and punched cherries!  


I did fussy cut the "sweet" out, but you could just as easily just stamp it on a banner or something and not cut it out to make the card even quicker! 

Thank you so much for visiting!  I hope you enjoyed this card!  Please let me know if you have any questions or need help with anything!  Would love to help you with all your papercrafting needs!  Or helping you get your hands on any Stampin' Up! supplies that you need!

Contact: designwithink@gmail.com

Tuesday, October 11, 2022

MOST DEFINITELY Scary Cute!!! With Watercoloring!

  Okay...my last post I mentioned that I just couldn't do Halloween when given a color challenge that reminded me of Halloween.  But now I can!  Haha.  I LOVE LOVE LOVE the Scary Cute Bundle...so I had to use that to make my first Halloween project of the season!

Colors Basic Black, Pumpkin Pie, Daffodil Delight, Polished Pink
Inks:  Pumpkin Pie, Daffodil Delight, Polished Pink, VersaMark, BLENDS: Parakeet Party Dark Stampin' Blends Marker
Cardstock/Papers: Basic White, Thick Basic White, Basic Black, Fluid 100 Watercolor Paper
Stamps: Scary Cute
Tools:  Scary Silhouettes Dies, Stitched With Whimsy Dies, Heat Tool, Gingham Embossing Folder, Rectangular Postage Stamp Punch, Water Painters
Accessories: Basics Embossing Powder, Soft Sea Foam 3/8" Seam Binding Ribbon, Adhesive Backed Seasonal Sequins

Are you as obsessed with that watercolored background as I am?!  Haha.  I LOVE IT!  And I LOVE these cute kiddos!  They are embossed with Black Embossing Powder so they are all glossy and wonderful!


And I also LOVE the Scary Silhouettes Dies ... LOVE the detail that that moon & bats add! 😍


One fun little other tip is with the greeting.   I used the Rectangular Postage Stamp Punch...but if you can recall, the punch is much taller than what is shown here.  So your tip...punch it out, lining up the greeting with either the top of the bottom of the punch...don't worry about how much space is on the other side.  Then stick the greeting to a Post-It (to give you something to hold on to), and put it back into the punch to line up the other end.  Just line up the notches on each side and punch again!  VOILA!  A shorter Postage Stamp Punch!


And YES...this ribbon may look a bit different than the original Soft Sea Foam Seam Binding Ribbon.  Once again... I colored the ribbon with a Stampin' Blends Marker!  This time...Dark Parakeet Party! 💓

What is your favorite part?!  Are you making anything fun for Halloween?!  I am still deciding all the things I want to do!  Crafting for Halloween is so much fun!  

Thank you for visiting!  Please let me know if you have any questions!  Would love to help you with all your papercrafting needs! 

Contact: designwithink@gmail.com

Friday, October 7, 2022

HELLO!!!???...Ladybug?!?! TGIF Challenge #389

Hello!  It is COLOR CHALLENGE time for TGIF Challenges this week!  You know I love a good color challenge.  This one was a bit of a challenge, but it was fun.  You see...when I show you the challenge graphic...you will probably think of one specific holiday with these colors.  So that made me NOT want to make something for that holiday, you know?!  Hee.  But I have to admit...I really love what developed...

Colors Basic Black, Pumpkin Pie, Daffodil Delight, Basic White
Inks:  Daffodil Delight, VersaMark, BLENDS: Pumpkin Pie Dark Stampin' Blends Marker
Cardstock/Papers: Basic White, Thick Basic White, Mango Melody, Pumpkin Pie, Black & White Designs Designer Series Paper
Stamps: Hello Ladybug 
Tools:  Ladybug Builder Punch, Heat Tool, Painted Texture Embossing Folder, Stylish Shapes Dies
Accessories: Basics Embossing Powder (white), White 1/4" Crinkled Seam Binding Ribbon, Baker's Twine Essentials Pack, Iridescent Rhinestones Basic Jewels

Can you guess the color combo we are challenged to use this week?!  Well let me help!

Can you guess the holiday you may think of with these colors?!  Haha.  Halloween, right?!  So I went the opposite direction and went cutesy floral.  Hee. 

Now...you may be asking ... what is that fun, large, bold & graphic flower from?!  Well ... unless you read the title of this post (haha) ... you may be a bit surprised!  The stamp I used for this flower was the ladybug body from the Hello Ladybug Stamp Set!!!  Say WHAT?!  How?!  Haha.  Let me "show" you.  

First...I stamped the ladybug body in Daffodil Delight.  (I know...I changed it up a bit and didn't use Crushed Curry.  This is just supposed to inspire you, not define you.  Haha.  Then I took the polka dot image that is supposed to be for the wings and stamped the body with it.  The whole stamp is a bit big for the body, but since it is a photopolymer stamp, I simply "folded it" in half over my block and used the smaller portion.  Here is a photo to helpfully help explain what I am saying better.  😊

Then I just punched out the ladybugs, and adhered them together.  I added a circle (cut from Stylish Shapes Dies) to the middle of the now flower, and VOILA!  Cute little ladybug flower...


Isn't that so much fun!  Then just added a few layers and embellishments and I am in love! 😍


Love that repeating sentiment!!  I love little touches like this that add such a fun detailed touch.  One more fun element that I want to point out...

Look at that fun Pumpkin Pie ribbon!  No...Stampin' Up! doesn't sell Pumpkin Pie ribbon like this.  I just colored it with the Dark Pumpkin Pie Stampin' Blends Marker!  I love this fun trick!  The ribbon is actually the White 1/4" Crinkled Seam Binding Ribbon.  

Now that I have shared my card with you...it is time for you to come play along with us!  Hee.  So head on over to the TGIF Challenge Blog to see what the other designers have made and to play along!  Can't wait to see what you create!!!

Please let me know if you have any questions or need any help getting your hands on any Stampin' Up! supplies!  Would love to help you with all your papercrafting needs!

Contact: designwithink@gmail.com

Wednesday, October 5, 2022

Tag Celebrations Meets Textural Elements...

 Hello!  How is your week going?!  It's Wednesday!  How does time fly so fast?!  I swear it feels like it was just the weekend a second ago.  But I have a fun mid-week pick me up!  A yummy chocolate treat showing off in a cute Peekaboo treat bag!  

Colors Coastal Cabana, Polished Pink, Basic White
Inks:  Polished Pink, VersaMark
Cardstock/Papers: Basic White, Coastal Cabana, Black & White Designs Designer Series Paper
Stamps: Celebrate With Tags, Season of Chic (greeting)
Tools:  Celebrations Tag Dies, Heat Tool, Blending Brushes
Accessories: Basics Embossing Powder (white), For Everything Fancy Sequins, Linen Thread, Textural Elements, Soft Sea Foam 3/8" Seam Binding Ribbon, Peekaboo Treat Bags

I mixed up some products from Stampin' Up!'s July-December Mini Catalog for this treat bag, and I think they all work fabulously together!  I LOVE the Textural Elements from the Boughs of Holly Suite, the Black & White Designs from the Halloween section of the catalog (that I colored with a Blending Brush!), and the Celebrate With Tags Bundle!  Some of my favorite products!!  Just look at this fun tag...

Did some ombre blending by just always starting my blending from the bottom of the paper, and working my way up.  Then adhered it to the tag that was die-cut using the Celebrations Tags Dies.  The greeting was embossed on Coastal Cabana cardstock then just cut out with scissors.  (The "thanks" is from the Season of Chic Stamp Set that is in the Annual Catalog.  I LOVE this whole bundle!) Layered it all together with the Textural Elements, Linen Thread, and For Everything Fancy Sequins.  😍😍😍

It was the perfect tag to add to these DARLING Peekaboo Treat Bags! Just had to quickly "dress up" the bag a bit.  But all I did was some quick stamping on the corners of the bag...


I love how it just all comes together...

What do you think?!  What is your favorite part?!  I think my favorite part is the ombre Designer Series Paper.  Have you ever colored your Designer Series Paper before?!

Contact: designwithink@gmail.com

February Fancy Blue!

Time for this month's Stampin' Fancy Friday challenge! And this one is a GOOD one!  Are you ready for SOMETHING BLUE?!  Colors :   C...