Friday, November 29, 2024

Secret Santa CASING! With the 2024 Stampin' Up! Artisan Design Team!

The 2024 Stampin' Up! Artisan Design Team is feeling the spirit of the season.  Today we are hopping, but this isn't an ordinary hop.  This is a special Secret Santa Gift Exchange Hop!  Earlier we drew names and then got busy hand stamping a project just for them.  The projects in the hop are all gifts to one another.  

Instead of buying them a gift, we each CASE'd our Secret Santa name to make a card in their honor!  💗  It was so much fun!  So ... who did I draw to CASE?!  Why none other than the fabulous Jacque Williams! 😍  

She has such a fun & fresh style.  Her cards always make me smile.  The card I picked of hers to CASE (will share her card below) was a cheery card & I loved the layout.  As I was scrolling through all her gorgeous projects, I also noticed a few rainbows on some projects - so that kind of stuck with me.  So this is the card I created for Jacque! 


All supplies are from ©️ Stampin' Up!

Colors Melon Mambo, Peach Pie, Lemon Lolly, Lemon Lime Twist, Coastal Cabana, Gorgeous Grape, Basic White, Basic Black, Gold
Inks: Melon Mambo, Peach Pie, Lemon Lolly, Lemon Lime Twist, Coastal Cabana, Gorgeous Grape, VersaMark
Cardstock/Papers: Coastal Cabana, Basic White, Basic Black, Regal Distressed Patterns, Textured Metallic Specialty Paper, Fluid 100 Watercolor Paper
Stamps: Cheerful Daisies
Tools:  Cheerful Daisies Dies, Water Painter, Heat Tool
Accessories: Basics Wow! Embossing Powder, Neutrals Adhesive-Backed Sequins, Petal Pink & White 1/4" Diagonal Trim Combo Pack

Jacque is such a bright person, so I wanted the card to be a bright card that would cheer anyone up.  The Cheerful Daisies Stamp Set & Dies were the perfect products to use.  Along with the word "brightest" in the sentiment!  😍

This is the card I CASE'd ... 


Is it not just the cutest thing ever!  And I just loved the simple & clean layout!  You could use this again and again! 

Here are just a few more pictures of the card I made to show you some details: 

I used the Regal Distressed Patterns Specialty Designer Series Paper as a background to the card.  I love the subtle gold foil plaid pattern.   The background to the focal point has a fun watercolor wash with some splatter.  I love how it makes the embossed & watercolored flowers focal point (in rainbow colors! 💗) pop even more.

The Textured Metallic Specialty Paper adds such a stunning detail too.  Really adds to the overall cheery vibe - in my opinion.  Hee.  

And then truly ... can't go wrong with a rainbow!  🌈  They are one of my very favorite things - as is this Artisan Design Team!  💖


So I hope you enjoyed my take on our Artisan Design Team Secret Santa Exchange!


We had a lot of fun making our projects with you - and sharing them throughout the year! 😍  So thank you for visiting!  And if you want to check the whole hop out ... head on over to Instagram to play along!  

Secret Santa Hoppers
Alanna - @sleeplessstamper
Ashley - @designwithink  
☆ THIS IS ME! 
Bree - @craftsomnia
Dani - @danisthoughtfulcorner
Daniela - @edelpappe
Elizabeth - @seeinginkspots
Isabelle - @barbier_isabelle_demo_su
Jacque - @stamphappycards
Jenni - @paulinespapier
Kim - @simplyfairies_kimfee
Maheswari - @maheswarirajaguru
Mikaela - @thecraftyoinkpen
Monique - @stampin_met_monique
Narelle - @narellefarrugia
Su - @aromasandart
Teri - @alaskastamper
Verena @simple_stamper
Yvonne - @thecreativeteacup

And here is a list of those of us in our fun Artisan Hop that is also doing a blog post about it! 

Ashley Van Camp: https://designwithink.blogspot.com/2024/11/secret-santa-casing-with-2024-stampin.html  ☆ YOU ARE HERE! 

Elizabeth Price: https://seeinginkspots.blogspot.com/

Narelle Farrugia: https://www.narellefarrugia.net/

Su Mohr: https://aromasandart.com/

Maheswari Rajaguru:  https://mystampgarden.com/

Teri West: https://alaskastamper.com/

Yvonne Spikmans: https://thecreativeteacup.blogspot.com/

Monique De Kok-de Brabander: https://www.moniquedekok.com/

Mikaela Titheridge:  https://thecraftyoinkpen.co.uk/


And please let me know if you have any questions or need any help!  Would love to help you with all your papercrafting needs.  Would also love to help you get any Stampin' Up! supplies you surely need also! 

Contact: designwithink@gmail.com

Monday, November 25, 2024

Cake Fancy Birthday Wrapping ...

I love making gifts just a little extra fancy when I can.  And it's so easy to do with a fun handstamped tag.  This one was made with the Cake Fancy Stamp Set from Stampin' Up!  The birthday gal happens to love purple ... so of course that is the color choice I went with! 💜


All supplies are from ©️ Stampin' Up!

Colors Highland Heather, Fresh Freesia, Bubble Bath, Pool Party, Basic White, Basic Black
Inks: Fresh Freesia, Bubble Bath, Pool Party, Lemon Lime Twist, Gray Granite, Lemon Lolly, VersaMark
Cardstock/Papers: Highland Heather, Basic White, Basic Black
Stamps: Cake Fancy
Tools:  Wildflower Designs Dies, Heat Tool, Small Hole Punch
Accessories: Basics Wow! Embossing Powder, Iridescent Faceted Gems, Baker's Twine Essentials Pack, retired ribbon

Love this Cake Fancy Stamp Set.  Was so easy to put this together and love the soft & gorgeous vibe it gives! 😍  I paired it with the Wildflower Designs Die.  So really it was just some die-cutting then stamping & fussy cutting!  Easy breezy!  Not sure I will ever be able to stop using the Iridescent Faceted Gems either.  Haha.  


Thank you so much for visiting!  Please let me know if you have any questions!  And if you need this stamp set or die set to add to your collection - or anything else! - just let me know!  

Contact: designwithink@gmail.com

Thursday, November 21, 2024

Snowy Peaceful Evergreens ... Day 21 Christmas Card Making Challenge!

Ready for a little FIRST SNOWFLAKE inspiration today?!  Well I hope so ... cause that is the theme for Day 21 of the fun 30 Day Christmas Card Making Challenge that Martin's Mayhem is putting on! His card is fabulous, as always, and I wanted to share the one I made to play along!

All supplies are from ©️ Stampin' Up!

Colors Lemon Lime Twist, Granny Apple Green, Coastal Cabana, Basic White, Basic Black
Inks: Coastal Cabana, VersaMark
Cardstock/Papers: Lemon Lime Twist, Granny Apple Green, Basic White, Basic Black
Stamps: Snowy Wonder
Tools:  Snowy Wonder Dies, Peaceful Evergreen Dies, Countryside Corners Dies, Snowflake Sky Embossing Folder, Heat Tool
Accessories: Linen Thread, Basics Wow! Embossing Powder, Iridescent Faceted Gems, Pearlized Enamel Effects Basics

Now if you know me well ... or even just a little ... you probably know I don't really love snow.  Haha.  I am a warm weather kinda girl.  BUT - snow can be really pretty when it first falls up in the mountains.  So I kinda went with that theme.  

I die-cut two trees from Stampin' Up!'s Peaceful Evergreen Dies in each size in two different colors of green: Lemon Lime Twist & Granny Apple Green.  Then I just layered them together.  I liked the two colors to give contrast and make them really pop with dimension.  


The shimmer to a snowflake/snowfall is the best part to me.  When the sun hits ... I LOVE how it is all glittery & shimmery!  So to get that shimmer on this card ... I actually painted the embossed background and all the trees with the white Pearlized Enamel Effects.  In real life ... it is SOOOO pretty and glistening!  Not the easiest to capture in a photo, honestly, but I did my best.  😀


What do you think?!  Does this work for a "First Snowflake" Challenge?!  What are you going to make for this one?! 😀

Thank you so much for visiting!  Please let me know if you have any questions!  I would love to help you with all your papercrafting needs!  And if you need any Stampin' Up! supplies - and live in the United States - please just let me know! 

Contact: designwithink@gmail.com

Monday, November 18, 2024

Snowy Wonder Color Challenge! Day 17 Of 30 Day CCMC 2024!

Well I am a bit behind, but here we go with Day 17 of my friend Martin's 30 Day Christmas Card Making Challenge 2024!  This is such a fun thing he does - you should play along too if you haven't started yet!  He has a new challenge every day and it's fun to get a kick start into holiday projects, challenge yourself a bit, & see what he makes and everyone else that plays along!  It's a good time!  Hee.  

Day 17 is a fun color challenge! Pink, Teal, & Plum! Here is the card I made! 

All supplies are from ©️ Stampin' Up!

Colors Pretty In Pink, Pretty Peacock, Berry Burst, Basic Black, Basic White
Inks: Pretty In Pink, Pretty Peacock, Berry Burst, Coastal Cabana, Memento Black, VersaMark
Cardstock/Papers: Pretty In Pink, Pretty Peacock, Berry Burst, Basic White, Basic Black, Window Sheet
Stamps: Snowy Wonder
Tools:  Snowy Wonder Dies, Round We Go Dies, Timber 3D Embossing Folder, Heat Tool
Accessories: Baker's Twine Essentials Pack, Basics Wow! Embossing Powder, Iridescent Faceted Gems, Pearlized Enamel Effects Basics

I am a PINK Christmas girl so I LOVE LOVE this challenge!  Great one to get started with, right?!  Hee.  (Yes - I even have started doing a pink Christmas tree in my house and it truly makes my heart so happy!  Hee.)  Here is your official challenge graphic: 

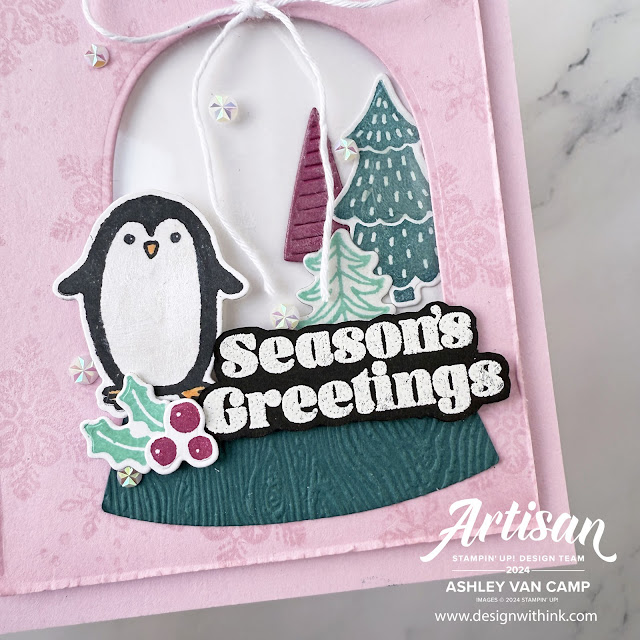
And some details on my card! I used the Snowy Wonder Bundle from Stampin' Up! and I have to say ... I am in love!  This cute little penguin is just the beginning of all the fun stamps & coordinating die-cuts that are in this bundle! 

I die-cut the snow globe piece directly from the Pretty In Pink card front, adhered a window sheet behind it (so in person it looks more glass like - just like a snow globe) and adhered that with dimensionals over the scene that is behind the card front.  Then just added the penguin/greeting/accents to the front of the card!  

Hard to tell in the photo ... but I did paint on some of the White Pearlized Enamel Effects on the penguin belly & over the trees.  It goes on pretty clear if you do a light coat and then gives a fun shimmer!  


I really love how it all turned out!  Have any questions?!

Thank you so much for visiting!  Please let me know how I can help you!  Would love to help you get any Stampin' Up! supplies that you may need (if you live in the United States) so let me know if I can help! 

Contact: designwithink@gmail.com

Sunday, November 17, 2024

Thoughtful Fall Wishes ... TGIF Challenge #499

Ready for a fun theme challenge this week for our TGIF Challenge?  I hope so ... because that's what we have for you!  🙌  Can you guess what the theme is based on the card I made?!

All supplies are from ©️ Stampin' Up!

Colors Soft Sea Foam, Crumb Cake, Petal Pink, Basic White
Inks: Soft Sea Foam, VersaMark
Cardstock/Papers: Soft Sea Foam, Crumb Cake, Petal Pink, Basic White
Stamps: Thoughtful Wishes, My Small Business
Tools:  Exposed Brick 3D Embossing Folder, Blending Brush, Heat Tool
Accessories: Linen Thread, Basics Wow! Embossing Powder, Neutrals Adhesive-Backed Sequins 

If you guess a fall challenge - you are correct! Autumn & Beautiful Leaves for you! 


I used the Thoughtful Wishes Stamp Set & did some embossing on some Soft Sea Foam cardstock.  Before I stamped and embossed, I used a Blending Brush with the same Soft Sea Foam ink to add some depth to the cardstock.

I used a Heat Tool to dry the ink on the cardstock before I stamped & embossed, but I liked how some of the white embossing powder kinda stuck to the ink anyway.  Kinda gives some white splatter that I loved on the card. 


Hope you enjoy!  This was a fun card to make, and pretty quick too. 

Now you get to head on over to the TGIF Challenges Blog to see what the other designers made & to play along with us! 💗

Thanks so much for visiting! Let me know if you have any questions or need help with anything!  And would love to help you get any Stampin' Up! supplies you need. 

Contact: designwithink@gmail.com

Saturday, November 16, 2024

Artisan Fun With the Happy Hibiscus Bundle! Blog Hop!

Artisan Blog Hop time!  Woot!  Your favorite time of the month, right?! 😊  I am so excited to share what we made with the products we were assigned.  Have you seen the Happy Hibiscus Bundle that was just released in the ☆ NEW  Online Exclusives?! Gah!  I squealed!  It is so gorgeous! And here are my projects that I made with them!


Want to see these cards up close?!  I hope so!  Cause I have some more pictures for you!  This first card was such a fun one to make.

All supplies are from ©️ Stampin' Up!

Colors Pool Party, Melon Mambo, Peach Pie, Lemon Lolly, Lemon Lime Twist, Basic White
Inks: Melon Mambo, Pretty In Pink, Lemon Lolly, Daffodil Delight, Peach Pie, Pumpkin Pie, Lemon Lime Twist, VersaMark
Cardstock/Papers: Basic White, Basic Black, Fluid 100 Watercolor Paper, Subtles 6"x6" Designer Series Paper
Stamps: Happy Hibiscus
Tools:  Happy Hibiscus Hybrid Embossing Folder (includes the dies), Cute Crochet Embossing Folder, Blending Brush, Sponge Dauber, Bone Folder, Water Painter (for splatter), Heat Tool
Accessories: Iridescent Foil Gems, Baker's Twine Essentials Pack, Basics WOW! Embossing Powder

The hibiscus flowers are full of dimension because they are stamped AND embossed/die-cut.  This bundle comes with a hybrid embossing folder ... and I LOVE these ... because it embosses and die-cuts at one time!  Winning!


I inked them with a few colors but don't worry ... it is so easy to do! 


Just ink in your lightest color first then take a sponge dauber and lightly pounce around the sides of the flower, creating the depth of the color.  Here are the colors I used for the flowers: 

    🌺  Pretty In Pink & Melon Mambo

    🌺  Peach Pie & Pumpkin Pie

    🌺  Lemon Lolly & Daffodil Delight

Then the other details of the card include some die-cutting & blending color (the leaves), die-cutting & watercoloring (the label), embossing with fussy cutting (sentiment), embossing with distressing (Basic White card front piece).  


I really like how it all turned out and I felt so artsy making it.  😁

This next card was really fun and felt so "artsy" making it too!  Hee.  It has some watercolor washing, splatter, fun pleated paper detail, fun flower accent element, etc. 

All supplies are from ©️ Stampin' Up!

Colors Lemon Lolly, Peach Pie, Flirty Flamingo, Coastal Cabana
Inks: Lemon Lolly, Peach Pie, Flirty Flamingo, VersaMark
Cardstock/Papers: Lemon Lolly, Coastal Cabana, Basic Black, Fluid 100 Watercolor Paper, Brights 6"x6" Designer Series Paper, Window Sheet
Stamps: Happy Hibiscus
Tools:  Happy Hibiscus Hybrid Embossing Folder (includes the dies), Water Painter, Heat Tool
Accessories: Iridescent Foil Gems, Baker's Twine Essentials Pack, Basics WOW! Embossing Powder

I did a watercolor wash with Lemon Lolly, Peach Pie, & Flirty Flamingo.  Then I made sure it was really dry (hit it with the heat tool to make sure even) and stamped and embossed the flowers over the watercoloring.  

I love the little Coastal Cabana detail piece on the side.  It is the label die-cut piece that I just folded over to the size I wanted and adhered it.  


This fun pleating is so easy also!  You just fold it back and forth the length that you want it.  Then adhere!  This card has a fun little detail that is easier to see in person.  But ... if you look at the photo below you can see them.  I die-cut some of the smaller flowers from a Window Sheet.  And I love the little detail it adds.  😍


So what do you think?!  Are you in love with this Happy Hibiscus Bundle like I am?!  😍 


If you aren't in love just yet, you will be soon!  Just keep on hopping and I assure you that you will be in love!  
Because YES!  SO MUCH more beauty to see as you hop along! SOOOOO ... 

NEXT IN OUR HOP IS ...

Daniela: @edelpappe  https://www.edelpappe.de/blog/

Her projects are gorgeous!!  You better follow along to see! 😀 Over on Instagram is the best place to see them!

Full list of hoppers: 

Monique:  @stampin_met_monique  
Ashley: @designwithink  ☆  This is me!  ☆
Daniela: @edelpappe
Maheswari: @maheswarirajaguru
Su: @aromasandart


Thank you so much for visiting!  I hope you enjoy this hop!  Please let me know if you have any questions or need any help ordering any Stampin' Up! products! (If you live in the United States ... I can help you with that too!)  I would be happy to help you with your papercrafting needs! 

Contact: designwithink@gmail.com

Friday, November 15, 2024

Artisan Design Team 2025 ... Let's GOOOOOO!

📣 🩷👏 I can finally tell you ... I was chosen to be on the 2025 Stampin' Up! Artisan Design Team!!!  AHHHHH!!  I am so sad this year was coming to a close, and although I still am and will miss the 2024 team IMMENSELY!, I am excited for the crafty fun to continue on! 📣 🩷👏 


I never thought I'd be picked for a 2nd year in a row but here we are!  Yay!  I get another year of sharing (& hopefully inspiring!) all sorts of crafty fun, working with a team of fabulous people around the world and at the Stampin' Up! Home Office, boxes of FREE products, and so much more! 😍


Thank you, Stampin' Up!, for another fun opportunity to be on this team of fabulousness! 

And what's a spot on the team without a selfie photoshoot with this first fun box we receive?! 😂😆


Can't wait to share more crafty goodness with you! 

Contact: designwithink@gmail.com

Wednesday, November 13, 2024

Rainbow Bright Skies For Some Cheer!

Who needs a little cheer to brighten their day?!  I know the day I made this card, I did!  Sometimes you just need to make a card for yourself, you know?!  😁  

All supplies are from ©️ Stampin' Up!

Colors Melon Mambo, Peach Pie, Lemon Lolly, Lemon Lime Twist, Coastal Cabana, Highland Heather, Basic White, Basic Black
Inks: Lemon Lolly, Coastal Cabana, VersaMark
Cardstock/Papers: Melon Mambo, Peach Pie, Lemon Lolly, Lemon Lime Twist, Coastal Cabana, Highland Heather, Basic White, Basic Black, Adhesive Sheets
Stamps: Bright Skies
Tools:  Bright Skies Dies, Birch Wood Embossing Folder, Blending Brush, Water Painter, Heat Tool
Accessories: Iridescent Faceted Gems, Basics WOW! Embossing Powder

I had a lot of fun making this card & it really cheered me up.  The rainbow is made with small strips of cardstock that I adhered in rainbow order.  Then I just stamped & die-cut the sun out.  And die-cut some clouds to layer on the bottom of the card. 

The background was just made by using a Blending Brush to add a light layer of Coastal Cabana ink & some splatter.  Then embossed with the Birch Wood Embossing Folder.  

This was a fun and fairly quick card to make!  Here are some more photos to see the details! 


I hope you enjoy this card!  And if you need some cheering up ... reach for those crafting supplies!  Being creative is so helpful for so much!  And now I have a fun card to share with someone else that needs some cheering up! 💗

Thank you for visiting!  Please let me know if you have any questions or need help getting any Stampin' Up! supplies (and live in the United States).  

Contact: designwithink@gmail.com

Artisan Fun With The Cake Celebrations Bundle! Blog Hop!

Woot!  WOOT!  Another Artisan Design Team Mini Blog Hop!  Today we are sharing our projects that we made with the Cake Celebrations Bundle f...