Friday, July 26, 2024

Beach Day Summer Inspiration ... TGIF Challenge #483!

Fun inspirational challenge over on the TGIF Challenge Blog this week!  Maybe my favorite because it is all about summer!  Yippee!  My favorite time of year!  😃 And since the beach is my favorite place to go any time of year, and especially in the summer, I used the Beach Day Bundle for this challenge!

Colors Lemon Lolly, Summer Splash. Pretty In Pink, Bubble Bath
Inks: Memento Black, BLENDS: Pretty In Pink, Bubble Bath, Melon Mambo, Petal Pink, Pool Party, Summer Splash, Lemon Lolly
Cardstock/Papers: Basic White, Lemon Lolly
Stamps: Beach Day
Tools:  Beach Day Dies, Everyday Details Dies, So Swirly Embossing Folder
Accessories: Iridescent Faceted Gems

I have been wanting to make a pink lifeguard house card since this stamp set came out, so about time that I did, right?!  Hee.  Stampin' Blends are the star of the show with this card.  I used them to color all the stamped pieces, and I also used them to draw the stripes on the sides of the card front.  😍

And here is the official challenge: 


Want to see some of the details up close?!  Well - here you go!  This was such a fun card to make! 


A few details: 

    🏖  Stamp Beach Day images.  Color the images using Blends Markers.  Die cut using the Beach Day Dies.

    🏖  Die-cut some palm tree pieces from Basic White cardstock.  Adhere together.

    🏖  Use Everyday Details Dies to cut a circle and blend Lemon Lolly & Peach Pie ink with Blending Brushes. 

    🏖  Emboss a piece of 4" x 5 1/2" Basic White cardstock with So Swirly Embossing Folder. 

    🏖  Use Lemon Lolly Blends Marker to draw stripes on 2" x 5 1/2" Lemon Lolly cardstock.  Cut in half vertically, making 2 - 1" strips.  Adhere one strip on each side of Lemon Lolly card base.

    🏖  Layer all the pieces together!


Hope you enjoy this card!  If you have any questions ... let me know.  It was an easy card to put together with the coordinating Beach Days Stamp Set & Dies.  

Thank you so much for visiting!  Would be happy to help you with all your papercrafting needs! Don't hesitate to reach out if I can help! 

Contact: designwithink@gmail.com

Wednesday, July 24, 2024

Stampin' Fancy Friday Fancy Color Combos!

This month on the Stampin' Fancy Friday Design Team ... we are coming at you with Fancy Color Combos!  And it has been a FUN challenge with so much variety!  I hope you have been following along, and if you haven't ... you can always start now!  Just head on over to @stampinfancyfriday on Instagram!  

Today is the day I get to share my card with you!  I am excited because I LOVE this color combo.  It is so summery and bright and fun to me ... which are all things I feel are appropriate to use year round!  Hee.  

Colors Peach Pie, Lemon Lime Twist, Coastal Cabana, Gray Granite
Inks: Coastal Cabana, Peach Pie, Lemon Lime Twist, VersaMark
Cardstock/Papers: Basic White, Basic Black, Fluid 100 Watercolor Paper, Lily Pod Lane Designer Series Paper
Stamps: Adventurous Sky
Tools:  Adventurous Sky Dies, Stylish Shapes Dies, Heat Tool
Accessories: Basics Embossing Powder, Adhesive-Backed Metallic Gems

And yes!  This is a similar color combo to the card I posted yesterday.  What can I say ... I can't stop using it - or variations of it.  I just love it! 😀 

Also ... I LOVE this bundle from Stampin' Up!  It is called Adventurous Sky.  It worked really well with this color combo, in my opinion.  

I first want to share how I did the center of the card detail, and then I will show you some more up close photos of the card.  


This is really SO EASY & quick to do!  You just die-cut whatever shape you want from a piece of cardstock.  ***TIP: I cut mine to a bit larger than the piece of cardstock I am adding the detail to ... just to avoid ink getting where I don't want it.  Add color with a Blending Brush in ink of your choice, stamp over where you just added ink, and splatter if you want.  Remove the mask you made and you are left with a fun detail to add to! 

And here are some more pics of the card.  I watercolored the planes, die-cut them, and added them around the circle sky.  


One last pic of the full card ... 


What do you think?  I would love to see anything you make with this color combo! 

And let me know if I can help you! Would love to help you with your papercrafting needs!  If you need to get this bundle, or any other Stampin' Up! supplies (and you live in the United States) ... would love to help with that too!  Don't hesitate to reach out! 

Contact: designwithink@gmail.com

Tuesday, July 23, 2024

Bistro Burger ... Take Two!

Earlier this month, some of my fellow Stampin' Up! Artisans & I did a fun Bistro Burger Hop!  You can see the card I created for it HERE.  It was such a fun hop, with lots of variety & creativity for using just one bundle.  Well ... I have another card to share today using that same bundle!  This time ... I wanted to show how a simple card works just as well with this bundle!  I also really liked the color combo from the cards I made in THIS POST, so I went with that combo again! 😍

Colors Gray Granite, Coastal Cabana, Peach Pie, Lemon Lolly, Basic White, Basic Black
Inks: Coastal Cabana, Peach Pie, Daffodil Delight, VersaMark
Cardstock/Papers: Gray Granite, Coastal Cabana, Peach Pie, Lemon Lolly, Basic White, Basic Black
Stamps: Bistro Burger
Tools:  Bistro Burger Dies, Metal Plate Embossing Folder, Heat Tool
Accessories: Basics Embossing Powder, Adhesive-Backed Shiny Sequins, Peach Pie 3/8" Bordered Ribbon

It really is a simple card to make.  I just stamped the images repeatedly on strips of cardstock and then layered them together on a card base!  Used one of the die-cuts that I embossed, a sentiment, and then some ribbon and sequins.  That's it!  It all went together very quickly and turned out so cute! 

A few more photos of some details: 


I hope you enjoy!  Thank you for visiting! Please let me know if I can help you with any of your papercrafting needs!  Would love to help!  Let me know if you need any Stampin' Up! supplies also!  

Contact: designwithink@gmail.com

Friday, July 19, 2024

Lily Pond Lane Makes My Heart Smile ...

Duckies are so cute, huh?!  😍  Also, the Lily Pond Lane Designer Series Paper pack (from the Lily Pond Lane Suite by Stampin' Up!) is so charming, cute, colorful, & cheery.  Well - yay!  I have good news for you ... this is a suite full of duckies! 👏 💕 Including some darling ones in the paper!  So I let the paper be the star of the show on this card, and just fussy cut pieces out from the paper.  This card makes my heart smile for sure. 

Colors Gray Granite, Coastal Cabana, Pretty In Pink, Peach Pie, Basic White, Basic Black
Inks: Coastal Cabana, VersaMark
Cardstock/Papers: Basic White, Basic Black, Fluid 100 Watercolor Paper, Lily Pond Lane Designer Series Paper
Stamps: Layers of Beauty
Tools:  Painted Texture Embossing Folder, Countryside Corners Dies, Water Painter, Heat Tool
Accessories: Basics Embossing Powder, Neutrals Adhesive-Backed Sequins

The sentiment is from the Layers of Beauty Stamp Set & the die cut shape is from the Countryside Corners Dies.  Add a little texture with the Painted Texture Embossing Folder, one of the other DSP patterns & a watercolor wash/splatter ... and you have a fun backdrop for the darling duckies! 


I love how it all came together.  How can your heart not smile when looking at this card?! 😃


And so you can see just how cute this Lily Pond Lane Designer Series Paper is ... here is a photo of that also! 


Thank you for visiting!  I hope this inspires you to get crafty!  Please let me know if you have any questions or need help with anything!  If you live in the United States and need to get your hands on some Stampin' Up! supplies ... like this darling paper ... I can help with that also! 

Contact: designwithink@gmail.com

Wednesday, July 17, 2024

Life Is Sweet Thanks! ... June 2024 Paper Pumpkin Stamp Set Card!

I shared a few alternative projects made with June 2024's Stampin' Up!'s Paper Pumpkin Kit, called Life Is Sweet, a few weeks ago.  You can see them HERE and HERE.  Today I am sharing a card I made with the ☆ EXCLUSIVE ☆ stamp set that comes with the kit!  So don't forget ... when the kit is made & done ... you still have a fun stamp set to use!  

Colors Pretty In Pink, Peach Pie, Lemon Lolly, Lemon Lime Twist, Summer Splash, Fresh Freesia, Pool Party, Basic White
Inks: Pretty In Pink, Peach Pie, Lemon Lolly, Lemon Lime Twist, Summer Splash, Fresh Freesia, Memento Black
Cardstock/Papers: Pool Party, Basic White, KIT CONTENTS: vellum leaf
Stamps: Life Is Sweet (from kit)
Tools:  NONE!
Accessories: Iridescent Faceted Gems

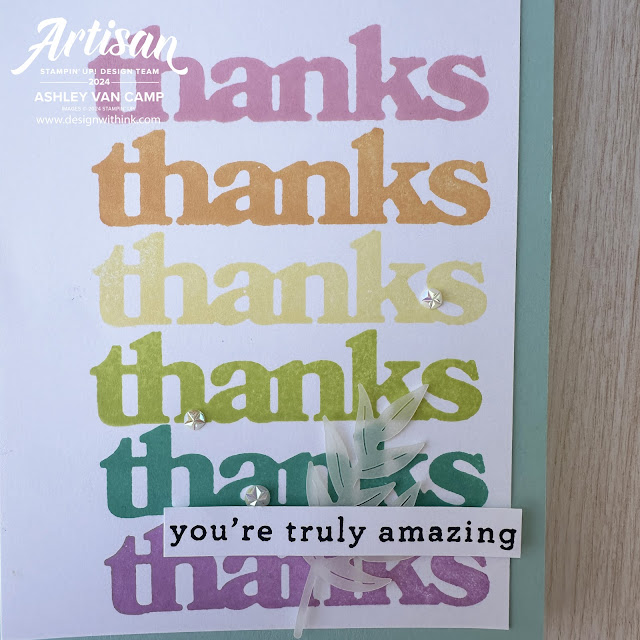
I really loved this stamp set.  The fonts and sayings are so much fun.  And yes!  You can use just fonts to make a dynamic card.  I quite love this rainbow thank you. 

💗🧡💛💚🩵💜   💗🧡💛💚🩵💜   💗🧡💛💚🩵💜


I did use one of the vellum accents that came from the kit that I had left over.  However, the rest is just cardstock & the Iridescent Faceted Gems.  😍


Have you used this stamp set since you made your kit?  Do you need to sign up for a Paper Pumpkin subscription and live in the United States?  I would be happy to help!  Thanks so much for visiting!  

Contact: designwithink@gmail.com

Saturday, July 13, 2024

Golden Greenery Mini Stampin' Up! Artisan Design Team Blog Hop!

Ready for another Artisan Blog Hop?!  Yesterday we hopped with most of the team with our BISTRO BURGER hop.  Today ... a few of us are hopping with projects we made using the ☆ NEW  Online Exclusive Bundle called Golden Greenery.  This is part of the Online Exclusive Season of Green & Gold Suite ... which is a STUNNING suite!  The suite includes this gorgeous Golden Greenery Bundle plus the fun Greetings of the Season Bundle ... with fun seasonal greetings & labels.  But ... add on the Everyday Greetings Stamp Set and these products are gorgeous to use all year long.  Which is what we are using on our hop today!  

So let's get going with the fabulous projects we have to share with you today! 

Have to pause and mention that I am a bit obsessed with this color combo.  Haha.  Pool Party, Peach Pie, and Lemon Lolly.  Well ... and Basic White.  I love how these subtle, but so cheery, colors all look together.  It makes me happy just to look at them.  Here are some more photos so you can see them better.

First up ... the Pool Party card!

Colors Pool Party, Peach Pie, Lemon Lolly, Basic White
Inks: Pool Party, Peach Pie, Lemon Lolly, Versamark
Cardstock/Papers: Pool Party, Peach Pie, Lemon Lolly, Basic White, Fluid 100 Watercolor Paper
Stamps: Golden Greenery, Everyday Greetings
Tools:  Golden Greenery Dies, Greetings of the Season Dies, Water Painter, Heat Tool
Accessories: Basics Embossing Powders, Baker's Twine Essentials Pack, Iridescent Faceted Gems

I used one of the label/tag dies from the Greetings of the Season Dies to make a frame for the card front.  I die cut it from the center of the card front, stamped it with one of the stamps from the Golden Greenery Stamp Set, splattered with ink, & then sponged the edges with a Sponge Dauber to make it all pop.  

Then I watercolored a piece of Fluid 100 Watercolor Paper in Lemon Lolly & Peach Pie & adhered the Golden Greenery Die-cut over it, so it would be "peeking out" when the frame was added.  Then adhered the card front using dimensionals, and add the greetings ... 


I love how this card turned out and want to make more with different color combinations, etc.  

Now here are some photos of the second card: 

Colors Coastal Cabana, Peach Pie, Lemon Lolly, Basic White
Inks: Peach Pie, Daffodil Delight, Versamark
Cardstock/Papers: Coastal Cabana, Lemon Lolly, Basic White, 2024-2026 In Color 6"x6" Designer Series Paper
Stamps: Golden Greenery, Everyday Greetings
Tools:  Golden Greenery Dies, Greetings of the Season Dies, Water Painter, Heat Tool, Cute Crochet Embossing Folder
Accessories: Basics Embossing Powders, Linen Thread, Peach Pie 3/8" Bordered Ribbon, Iridescent Faceted Gems

A few things to point out with this card: 

🍃  Stamp & splatter the Peach Pie Designer Series Paper.  Then distress the edges.  This gives some fun textures before you add the focal piece.  

🍃  Stamp the Lemon Lolly cardstock with Daffodil Delight ink using the two different "Congratulations" fonts at a diagonal.  Cut out using one of the tag pieces from the Greetings of the Seasons Dies. 


All in all ... I really love how this card came together also.  I love the pop of the white greenery die-cut, the subtle but vibrant color combo, the mix of fonts with the greetings, and how the fun textures & details all create a fun layered look.  

And now ... guess what?!   Time to keeping hoping and check out the projects my fellow Artisan Design Team members made!  You won't want to miss them! 

NEXT IN OUR HOP IS...

Daniela: @edelpappe  https://www.edelpappe.de/blog/

Her projects are STUNNING and you are going to love them!  Over on Instagram is the best place to see them!

Full list of hoppers: 

Monique:  @stampin_met_monique  
Ashley: @designwithink  ☆  This is me!  ☆
Daniela: @edelpappe
Maheswari: @maheswarirajaguru
Su: @aromasandart

Enjoy checking out all their gorgeousness!  Let me know if you have any questions on anything! I would love to help you with all your papercrafting needs!  And if you need any help getting your hands on any Stampin' Up! supplies ... most definitely would love to help there!  (If you are in the United States.)  So just send me a message and let me know! 

Contact: designwithink@gmail.com

Friday, July 12, 2024

Bistro Burger Fun!!! Let's "Meat Up" With An Artisan Design Team Blog Hop!

Burgers make the world go 'round! Several of the 2024 Artisan Design Team are showing off some stampin' skills all while featuring the Bistro Burger Bundle. It is officially over on Instagram, but some of us are posting to our blogs also.  So here we go!  

One of the best things about being on the Stampin' Up! Artisan Design Team is the relationships you form with the team.  This hop is a result of that.  Hee.  It all started on a team call with LOTS of giggles.  And in this call with giggles ... we had the idea to take the Bistro Burger Bundle and highlight it in a Artisan Design Team Blog Hop!  So here we go! 

Colors Misty Moonlight, Lemon Lime Twist, Pecan Pie, Granny Apple Green, Basic White
Inks: Misty Moonlight, Pecan Pie, Lemon Lime Twist, Granny Apple Green, Poppy Parade, Peach Pie, Stazon Black, Versamark
Cardstock/Papers: Misty Moonlight, Costal Cabana, Basic White, Basic Black, Fluid 100 Watercolor Paper
Stamps: Bistro Burger
Tools:  Bistro Burger Dies, Metal Plate Embossing Folder, Water Painter, Heat Tool
Accessories: Basics Embossing Powders, Iridescent Foil Gems

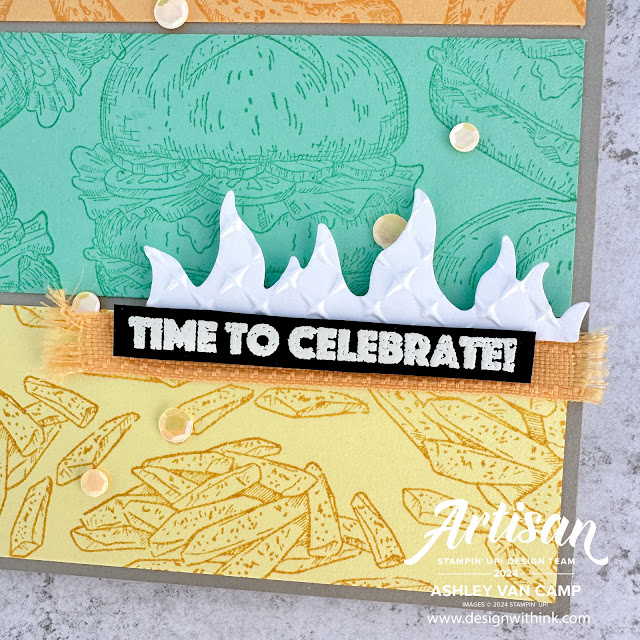
One of the big source of giggles and inspiration for the hop was the pickle in the stamp set.  Also known as a gerkin in some of the countries represented on the design team.  So I had to give them a highlight on
 my card.  Hee.  


I also really loved the flame die-cut so I cut some of those out and adhered them onto a piece of Basic White cardstock embossed with the Metal Plate Embossing Folder.


The background Misty Moonlight Cardstock piece is stamped with the fry stamp for a fun detail as well.  


Here is one last look at the full card then it is on to hop around to see more inspiration! 


Now are you ready for some more "Meat Up!" fun?!  


Here is the full list of hoppers: 

Next up in our Burger Hop is ... Narelle!!! Check out her blog HERE or go find her over at @narellefarrugia !!! She has a fabulous card to share & I am excited for you to see it! Full List of Hoppers:
Su @aromasandart Bree @craftsomnia Elizabeth @seeinginkspots Teri @alaskastamper Yvonne @thecreativeteacup Mikaela @thecraftyoinkpen Verena @simple_stamper Ashley @designwithink *** YOU ARE HERE!! Narelle @narellefarrugia Daniela @edelpappe Dani @danisthoughtfulcorner Maheswari @maheswarirajaguru Monique @stampin_met_monique Alana @sleeplessstamper Kim @simplyfairies_kimfee

Enjoy the hop!  Let me know if you have any questions on anything! I would love to help you with all your papercrafting needs!  Also would love to help you get any Stampin' Up! supplies you are in need of!  

Thank you for visiting!

Contact: designwithink@gmail.com

Thursday, July 11, 2024

Mini Alphabet Gift Flair!

Need to spruce up a gift while adding a personalized touch to the gift?!  Well then I have a solution for you!  This was a quick & fun way I added a "gift tag" to a present that I plan on doing many more times.  😃 

Cute, right?!  Just a fun bamboo skewer with some birthday flair on top with the name of the gift recipient!  On the back (not pictured, sorry!), I added a fun punched shape with a birthday greeting on it.  So functional as well.  😍

And shout out to the Mini Alphabet Dies because they are SO much fun & so easy to use.  ***TIP:  add Adhesive Sheet to the back of the cardstock before cutting out the letters to make them stickers and easy to place & adhere! 

Then here it is in the gift ... such fun little birthday flair addition!  A fun tip:  I always grab some ribbon whenever I see it on Stampin' Up!'s Clearance Rack because it is fun to use for things like this! 


Hope you try this on your next gift!  Let me know if you have any questions!  Would love to help you with all your paper crafting needs! If you need any Stampin' Up! supplies coming to your door ... I can help with that too! 💕

Contact: designwithink@gmail.com

Tuesday, July 9, 2024

Cap & Gown Thanks!

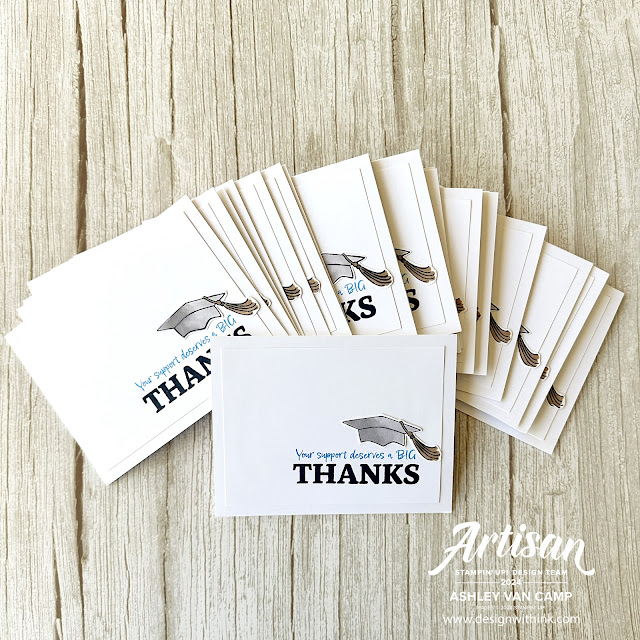
Remember all the graduation cards I shared?!  Well - my daughter also had some thank you cards for all the support she received from friends & family to send out.  So these were the quick, easy to mail, graduation thank you cards we made!  This would be an easy card to replicate and change up for any occasion you need!  I still used the Cap & Gown Stamp Set from Stampin' Up! along with the My Small Business Stamp Set.  

Colors  Azure Afternoon, Gray Granite, Black, Basic White
Inks: Azure Afternoon, Memento Tuxedo Black, BLENDS: Gray Granite, Pecan Pie
Cardstock/Papers: Basic White
Stamps: Cap & Gown, My Small Business
Tools:  NONE!
Accessories: NONE!

Just some white cardstock, a few ink pads, a greeting, and a themed image, & how cute! 💕

I always love a fun stack of cards!  It makes my heart happy! 


Thanks for visiting! Hope you enjoy! If you have any questions, please let me know!  Would love to help you with all your paper crafting needs!  And if you need any Stampin' Up! supplies ... would love to help there also! 

Saturday, July 6, 2024

Round We Go Floral Frenzy Banner!

I am excited to share a fun floral birthday banner today using the Round We Go Bundle!  These flowers are made in just a few fun and easy steps and make it so convenient to share bright and happy birthday cheer with anyone special you are celebrating!


Creating gorgeous WOW! projects is easier than you might think—and these paper flowers are the perfect example of that! When you have such a fun bundle like Round We Go to work with, in just a few simple steps these gorgeous paper flowers are ready to wow! Turning the flowers into a festive birthday banner gives you a convenient decoration to display anywhere to surprise your loved ones on their special day!

Here are the products you will need to make your own banner!


Round We Go Bundle (163730)
Countryside Corners Dies (161471)
Bough Punch (157711)
Petunia Pop Cardstock (163801)
Summer Splash Cardstock (163797)
Lemon Lime Twist Cardstock (144245)
Peach Pie Cardstock (163799)
Pretty in Pink Cardstock (163793)
Basic White Cardstock (159276)
Basic Black Cardstock (121045)
Fluid 100 Watercolor Paper (149612)
Pool Party Classic Stampin’ Pad (147107)
VersaMark Ink Pad (102283)
Water Painters (151298)
Stampin’ Spritzer (126185)
Petal Pink & White 1/4" (6.4 mm) Diagonal Trim Combo Pack (163417)
Flat Adhesive-Backed Pearls (160449)
Basics Wow! Embossing Powder (165679)
Stapler
Hole Punch
Rubbing Alcohol

And now are some tips to help you make it yourself! 

Stamp a confetti image in VersaMark ink on watercolor paper, then emboss it with white embossing powder. This creates a “resist” for the ink, so when you add color, the stamped images still show. Color the banner piece over the embossed images by using a Water Painter and Pool Party ink. Tip: Before opening the ink pad, squeeze it together so that the lid is squishing onto the ink pad. This creates a little pool of ink in the top of the lid, making it easy to grab the ink with your Water Painter.


Paper flower time! Die cut six large scallop shapes from cardstock. Stack the layers together and staple twice in the middle, overlapping the staples. Grab a Stampin’ Spritzer filled with rubbing alcohol and spritz the top flower layer. Scrunch that layer up towards the center. Repeat by spritzing the layers and scrunching them up, creating the full flower. Gasp as you see a few flat layers of cardstock become something so special and gorgeous! Repeat with different color cardstocks and/or the pointy scallop die to make as many flowers as you want!

Die cut five daisies. Using a Mini Glue Dot between each layer, adhere the layers together, alternating the petals. Then, just pull the petals up towards the center and add a Flat Adhesive-Backed Pearl to the center.


Adhere the flowers to the banner pieces, scrunching them close to each other for a full look. Add some leaves with the Bough Punch and any greeting you want!


This was such a fun project to make!  I hope you enjoy!  If you have any questions ... please let me know!  Would love to help you with all your papercrafting needs!  And if you need any help getting any Stampin' Up! supplies, and live in the United States, let me know!  Would love to help!  

Thank you for visiting! 
Contact: designwithink@gmail.com

Artisan Fun With The Cake Celebrations Bundle! Blog Hop!

Woot!  WOOT!  Another Artisan Design Team Mini Blog Hop!  Today we are sharing our projects that we made with the Cake Celebrations Bundle f...