Thursday, June 3, 2010

Artisan Award Entry #7

I have been having fun showing you all the projects I entered into the Artisan Award...and thank you SO MUCH for your comments and emails! Seriously....THANKS! It's starting to ease the pain of not earning the award. :) I am showing you another one of my cards today. After this one...I only have ONE more card to show you. And then ONE more scrapbook page. And then ONE more 3-D item. So just a few more projects to go! But here is this card for today...
Now...I realize you can't tell yet from this picture...but the top from this card is all glossy and shiny. That's because I have a window sheet over the whole thing. The "{friend to friend}" accent piece is on top of the window sheet, as well as the More Mustard floral piece. Here is a close up...
I used the "Paradise" stamp set. I LOVE this one!!!! And the colors I used are Dusty Durango, More Mustard, Old Olive, Chocolate Chip, and a TITCH of Not Quite Navy. I stamped the Whisper White piece with all the images, and then I spritzed the whole thing with the Color Spritzer tool and a Not Quite Navy marker. (I LOVE that thing!!!) I also sponged the edges with Old Olive ink. Here is a close-up that you can see the window sheet better...
And then here are all the layers...
It really looks so fun in real life. Oh....and to adhere the window sheet to the card...I just did a strip of adhesive right under where I put the ribbon. So that's how it's attached.
Thanks SO MUCH for visiting and I really hope you enjoy!!!

Wednesday, June 2, 2010

Artisan Award Entry #6

Have one of my 3-D items to show you today! This one really is quite fun in person. And this all started with the Petal Card Die. Funny story about this project...actually. I could NOT think of a 2nd 3-D item that I wanted to make. (I already had my first one done....I will show you that last cause it's my FAVORITE project and saving the best for last. :) ) It was the day before I needed to get all my projects turned in and I was just waiting for some inspiration to come to me. And this is what happened...
This box uses 16 Petal Cards. I just adhered 4 together to create each individual box. Then adhered all the boxes together to make this one piece. It uses a TON of Sticky Strip and was quite fun to make! The side with the tied bow is the front. I used Cottage Wall Designer Series Paper for the wrap, and then two Butterfly dies and the Big Shot...Beautiful Butterflies and the Beautiful Wings Embosslit. The butterflies are so pretty in real life. I sponged them all with their same ink that the cardstock was for a tone on tone POP! :) Then I added a Pretties pearl in the middle and spritzed with some Shimmer spray I made with the shimmer paints. Finally, I curled the wings with my Bone Folder. Here are some photos of all the other sides...

And here is a close-up of a butterfly so you can kinda see how sparkly they are...
And then you just close all the flaps and see this at the top...
And then a special treat for you when you open them all up...
I even picked out coordinating colored candy to go inside the box. I put the candy in a cello bag, and sealed it closed. Then I wrapped the bag with ribbon and added a coordinating butterfly on top. Here are all the individual bags of candy...
How much fun...right?!?! :) And then here is a view with all the flaps opened...
I really do like this project more than I did when I started. Maybe I'll make another one some day. :) And actually...this Petal Card die is retiring...and I recommend owning this one for sure!
Thanks for visiting! I hope you enjoy! And I really hope you are enjoying seeing all the Artisan Entries!!!

Tuesday, June 1, 2010

Artisan Award Entry #5

This card entry is a 3x6 card. I really like this size of card. I think they are fun. And again...I tried to do a variety of styles/sizes of cards. Here is the boyish one that I came up with... I LOVE this surfer stamp. I guess I love anything about the beach so why wouldn't I love this?! :) Now on to some details...
I embossed the Surfer on a Whisper White cardstock piece. Then I spritzed the background with Taken With Teal marker and Color Spritzer tool. I sponged the edges with Taken With Teal ink. Then mounted the Whisper White cardstock onto a piece of the Groom Specialty Designer Series Paper. (This stuff is SO GORGEOUS!!!) Then adhere that onto Taken With Teal cardstock. I then embossed the surfer on another Whisper White cardstock piece, cut it out, and put it on dimensionals on the card to make it pop a bit more.

For this sentiment (from the FYI stamp set), I also embossed it. This time on Taken With Teal cardstock. Did some color spritzing again and punched out with the 1 1/4" circle punch. Then punched out a Basic Black background with the 1 3/8" circle punch. Added a Basic Black brad to tie it in with the bottom of the card. The ribbon is the Certainly Celery Satin ribbon.
The background that I stamped is actually two different stamp sets. I first stamped the "Sanded" background on the whole card. Then I came back with my "Extreme Elements" stamp set and stamped that blobby looking stamp over the Sanded background. Love the look. :) Then I did a little scallop border and added Basic Black brads at the valley of each scallop.

The "you are awesome" is stamped on the textured Certainly Celery cardstock piece that is adhered to the inside of the card. It's also embossed...which just makes everything pop more!
I hope you enjoy this card! Thanks so much for visiting! I will share another entry tomorrow! I'm having so much fun sharing these with you so hope you are enjoying seeing them! :)

LAST CHANCE LISTS ARE HERE!!!!


LAST CHANCE LISTS ARE HERE! (The last chance items are products that are retiring on June 30th and won't be available for purchase! Accessories are only "while supplies last" so they won't even last that long!) There are even some retiring accessories that are 25% off...or 50% off!!!!
Click HERE to see the retiring stamps list.

Click HERE to see the retiring Definitely Decorative list.

Click HERE to see the retiring Accessories list.

If you would like to see the images of any of these items and don't have your catalog with you...click HERE to go to the Stampin' Up! store.

If you would like to purchase any items...just send me an email or give me a call! Or you can order 24/7 on my website... http://www.ashleyvancamp.stampinup.net/ .

ALSO...Stampin' Up! is offering a GREAT DEAL to recruit now! They have a $99 Mini Starter Kit! Let me know if you would like any information on that! There are SO MANY reasons to be a Stampin' Up! demonstrator! :)

Let me know if you have any questions!!!!

Monday, May 31, 2010

June Card Kit of the Month...

Stamp Set of the Month: Elements of Style
Accessory of the Month: Mini Vintage Tags

It's card kit time again! You will LOVE this stamp set and these cards!

In this kit, you'll receive the supplies to create SIX of EACH design shown above - so you will receive all of the consumable supplies that you need to create 12 cards total.

You will also receive 2 additional full color samples of "alternative" cards that you can make with the combined contents of the kit, as well as step by step instructions on how to complete each of the 4 designs.

Card Kit Price is just $15--that's 12 cards, plus envelopes for just $15!

Each month, the card kit also features both a Stamp Set of the Month and an Accessory of the Month. If you purchase the card kit, you may also purchase these items at 20% off!

June Featured Products:
  • Elements of Style Stamp Set: Wood - ($27.95) $22.36*; Clear - ($19.95) $15.96* with the purchase of Card Kit
  • Mini Vintage Tags ($4.95) $3.96* with the purchase
    of the Card Kit

*Regular Shipping and Tax Apply

What else will you need? See the list below for items that were used to create the cards in this kit. If you already have everything--just buy the card kit and you are ready to create!

If you don't have everything--place a product order with your kit (don't forget about the discount on the "featured products!")

Or--you can use the card kit to create your own designs using other stamps and inks that you already have--the choice is yours!

Orders for the Card Kits must be received by June 15th. You will receive your kits by the end of the month.

Call or email me today to order:

Ashley Van Camp
801.404.1394
designwithink@gmail.com

Please Note: I am glad to ship kits directly to you! If the kit needs to be shipped, there will be an extra $3 shipping charge.

Products you will need to complete cards as shown:
  • Rich Razzleberry Classic Ink ($5.95)
  • Elegant Eggplant Classic Ink ($5.95)
  • Certainly Celery Classic Ink ($5.95)
  • Old Olive Classic Ink ($5.95)
  • Basic Black Classic Ink ($5.95)
  • Basic Black Stampin' Write Marker ($3.25)
  • 1" Circle Punch ($10.95)
  • 1 ¾" Circle Punch ($15.95)
  • Aqua Painters ($16.95)
  • Silver Foil Smootch Sprtiz ($4.95)
  • Vanilla Shimmer Smootch Sprtiz ($4.95)
  • Elements of Style Stamp Set: Wood - ($27.95) $22.36; Clear - ($19.95)$15.96 with the purchase of the Card Kit
  • Mini Vintage Tags ($4.95)$3.96 with the purchase of Card Kit
  • Stampin' Dimensionals ($3.95)
  • SNAIL Adhesive ($6.95)
  • Bone Folder ($6.95)
  • Paper Snips ($9.95)

Awesome Almost Artisans...

Some of my online friends that also submitted entries for the Artisan Award are sharing their projects on their blogs. I wanted to share the links to their blogs so you could go check them out! They have done AWESOME work! Just goes to show that Stampin' Up! had a DIFFICULT choice to make when choosing the winners. Check these out when you have a second! :)

Cindy
Jamie
Jackie
Patty
Katy
Melissa
Tina
Kelly
Ashley
Carmen
Monika
Tracy

Sam
Jenn
Renee
Carrie

Artisan Award Entry #4

Here's another one of the scrapbook pages I entered for the Artisan Award that I didn't win. :) I still REALLY like this page though. It's a picture of my nephew that I took when we were doing big family photos one day. I wanted to do a boyish page and since I don't have any myself...I thought this was perfect. This page actually has a lot of details going on, but it's a very simplistic page. Here it is!...
SO HANDSOME he is!!! Love this kid! Around that Crushed Curry circle in the top right corner are some fun silver brads...
I love the "manly" accent that adds!
I also love the stars stamped in Basic Gray on the Basic Gray textured cardstock. I did some spritzing with the FABULOUS spritzing tool and my Basic Gray marker. I then took a star Designer brad and altered it a bit. I smooshed it in Real Red craft ink and got the whole thing all inked up. Then I wiped off the ink on the top, so it just stays in the recessed parts. Then I put some clear embossing powder on there and heated it up so it wouldn't smear anywhere. I LOVE the color added on that!...
I used the Top Note in Bashful Blue to add a bit of interest and then also used some Silver Hodgepodge to tie in the silver brads. Once again, I used a Corduroy brad for some more texture. Can I say one more time that I LOVE THOSE THINGS!!!! :) ...
Then here you can see my glossy letters. I cut out the letters using my Simple Letters dies and the Big Shot. Then I put Crystal Effects all over them to give them that 3-D glossy look. LOVE these things! :) ...
I had a ton of fun making this page and hope you enjoy it! Thanks SO MUCH for all your comments/emails on my Artisan projects! You are awesome!!!! And thanks for visiting! :)
***STAY TUNED!!!!*** The Last Chance List is released TOMORROW!!! I will post it on my blog as soon as I see it! There will be hundreds of items retiring so order quick! I have a feeling some things will be going FAST!!!!

Sunday, May 30, 2010

Artisan Award Entry #3

Just sharing another one of my Artisan Entries. Another card. I wanted to do different sizes and varieties of cards, so I made this one a 5x5 card. I also used a Sweet Treat Cup to make it a shaker card...
This time it's a fun and cheery card. The flower is from the "Petal Pizazz" stamp set, the stem for the flowers is from the "Sweetheart" set (that is sold for the Heart Sweet Treat Cups. It isn't in a catalog...but you can still get it!), and then the saying is from the set "Stem Sayings." Here's a close-up for you...
Then for the inside of the Sweet Treat Cups I used some fun beads. I used the Pumpkin Pie and Pretty in Pink brads. I also stamped another flower from the "Petal Pizazz" set in Pumpkin Pie ink on Pumpkin Pie cardstock for the background of the Sweet Treat Cup. So as you shake the card...you can see that flower in the background.
Then the saying is embossed with Chocolate Chip craft ink and Clear Embossing Powder. Everything is sponged as well to make it pop.
Thanks so much for visiting! I hope you enjoy! And I SO appreciate your comments and emails. It's helping me heal from not winning. :)

Friday, May 28, 2010

Artisan Award Entry #2

Here is the first scrapbook page I'm showing that I entered into the Artisan Award. I have to say....I LOVE this page! It has so much more detail in person...and I will definitely have to make this one again for my own scrapbook. Here is the whole page...
(***Note: the year on this page is wrong. Maybe that's why I didn't win. :) This really was from 2007 but I had written 2009 and decided it didn't really matter since it wasn't going in my scrapbook.)

You may not be able to tell this in the photo....but the 12x12 sheet is textured cardstock. (Again...LOVE that stuff and the difference it makes!) But then the lattice pieces, (the things in the background...I cut that with the Lattice Die for the Big Shot) I cut out of smooth cardstock. So it makes them pop a bit more and the texture underneath them stands out more too. Hopefully you can kinda see in this picture...
(The letters are cut out of textured cardstock and sponged with Pretty in Pink ink.) For the "at me" part of the title...I stamped and cut those letters out (the alphabet is the Contempo Alphabet) and then put a layer of crystal effects on them. I LOVE this look. It gives them a glossy glaze, makes them 3-D and is just gorgeous! (On my other scrapbook pages I did the same thing with the bigger letters so you will be able to tell more with those. :) ) Then the background of the "at me" piece I ran through the Big Shot with the Perfect Polka Dot embossing folder. Then of course...sponged the edges. And gotta love those Corduroy buttons! They add so much texture and I LOVE using those!...
Here is another shot of that fun ribbon technique. What I did for this was put a strip of Sticky Strip down the page and then just folded the ribbon sticking it to that to make it look like this...
The satin ribbon is SO BEAUTIFUL and looks SO good! The arrows on the page I ran through the same Perfect Polka Dots embossing folder. And then used Very Vanilla Jumbo Brads. And take a look at my daughter's face as she goes down. TOO CUTE!!! (If I do say so myself! :) ) ...
Now look at those sweet little feet. :) Love them. Now on to that ruffly edge. (That patterned paper on the page actually matches my daughters dress almost PERFECT! So exciting!!! :) ) I took a few strips of the Designer Series Paper (oh...and it's from the Positively Prints pack in the Build-A-Bear collection. I love the prints in that and use them for lots of things that have nothing to do with Build-A-Bear!) and used the Eyelet border punch to make the decorative edge. Then did basically the same thing as I did with the ribbon. Laid down a strip of sticky strip and just folded it over on each other to get that look...
The colors of the page are Regal Rose, Pretty in Pink, Old Olive, and Very Vanilla. I hope you enjoy this page! I know I love it and it kinda makes me sad that the judges didn't. :) (OK...I know they could have loved it too. I know they had a SUPER hard time picking because there are lots of fabulous stampers out there that entered! So it's ok that I didn't win. (At least I'm trying to be ok about it. :) ) I'm excited for those that did for sure though. :) ) But I do hope you enjoy and thanks so much for visiting!!!

Thursday, May 27, 2010

Artisan Award Entry #1

This year I entered a HUGE contest that Stampin' Up! offers to their demonstrators. It's called Artisan Award. You have to submit 10 different projects (5 cards, 3 scrapbook pages, and 2 3-D items) of your BEST work. Then they judge them all and pick 10 winners. Well....this is my first time entering ANY sort of contest. And I guess it didn't pay off because I didn't win. :( BUT...now I get to show all of you what I submit! So silver lining, right?!? Anyway...it would be WAY too long of a post to share all 10 in one post...so I will spread them out over the next 10 days. I'm excited to show you! I tried to do a variety of styles and techniques and all sorts of stuff! So here is project #1...a card...
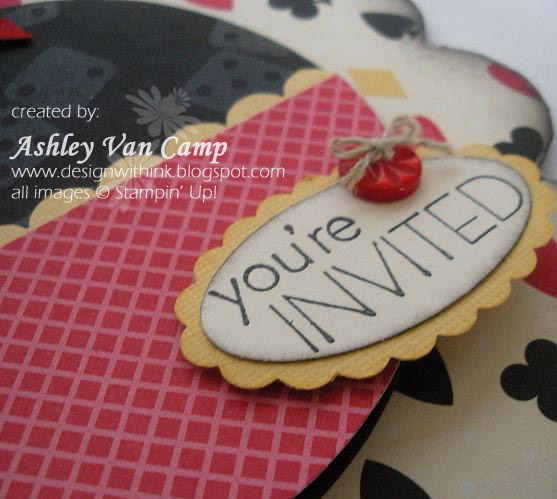
This card was made with one of the pages of the On Board Scallop Circle book from the Occasions Mini catalog. So...the big scallop in the background is chipboard. I LOVED this card. It's sad because all of these projects look SO much better in real life. But I'll never have them in my hands again. :( Stampin' Up! keeps all the projects you submit...so they are gone forever. But oh well. At least I remembered to take pictures. :) Oh...and all this stuff that I used is from the Game Night collection in the main catalog. Here are some close-up details...
I cut out the card with my Big Shot and the Clear Circle die. I embossed EVERYTHING that I stamped and then I also sponged all the edges of everything with whatever color cardstock I used. So things really popped in real life. I loved the dice in the background that I embossed. I just stamped in Basic Black craft ink on Basic Black cardstock. The embossed with clear embossing powder. The game pieces I stamped with either So Saffron craft ink or Real Red craft ink.
I LOVE textured cardstock! I think it makes SUCH a difference. I would use it ALL the time if it was sold in packs like the smooth is. :) Here is the card opened up...
And some close-up's...
This card really made me want to have a game night so I could make some invites. :) It was so much fun! I hope you enjoy! Feel free to leave me any comments that may make me feel better for not winning! :) Thanks for visiting!!

Use Your Stash! With Sunny Summer Fun!

Today is a fun Use Your Stash Hop! with a super fun theme ... Sunny Summer!  So I went all in!  I used the Rays of Light and Sharing Sunshin...