Wednesday, October 27, 2021

Pretty In Pink Penguin Place!!!

Have you seen the Penguin Place Bundle in Stampin' Up!'s July-December Mini Catalog?! It is SOOOO cute!  A darling stamp set AND coordinating punch?!  Yes, please!  Here is the first (of hopefully many!) cards that I made with it.  How CAAAAA-UUUUUUTTTTTTEEEEEE are these penguins?!  😍😍😍


ColorsPolished Pink, Pool Party, Soft Sea Foam, Whisper White
Inks: Mango Melody, Polished Pink, Memento Jet Black  BLENDS: Polished Pink Light & Dark, Soft Sea Foam Light
Cardstock/Papers: Whisper White, Polished Pink, Pool Party
Stamps: Penguin Place
Tools: Artistic Dies, Stiched So Sweetly Dies, Penguin Builder Punch, Palette Knives, Plenty of Patterns Decorative Masks
Accessories: Subtle Shimmer Sequins, Shimmery White Embossing Paste, White 3/8" Glittered Organdy Ribbon, Baker's Twine Essentials Pack

There are quite a few details going on with the card also.  So let me point a few out.  First up...where is that fabulous Polished Pink striped paper that is on the side?!  Well...I made it!  Just a piece of Polished Pink cardstock & a Polished Pink Blends Marker to swipe some stripes on! So easy and fun, huh?!  You can totally use a ruler and make these perfect. But that wasn't the look I was going for here...I just quickly swiped them on the cardstock!


Then of course you noticed that FABULOUS Embossing Paste, right?!  I used the Plenty of Patterns Decorative Masks and Shimmery White Embossing Paste to add that fun textured detail.  I ♡ LOVE ♡ LOVE ♡ LOVE ♡ embossing paste!!!! (MAJOR SWOON product for me.). 


Also...used more Blends Markers for some fun detail!  Behind the penguins, I wanted a little "grounding" for them...I felt they needed a little color wash.  I had already cut out the label (from Stitched So Sweetly Dies) with just regular Whisper White cardstock (not the Fluid 100 Watercolor Paper), so I didn't want to watercolor.  So I just added some color with the Light Soft Sea Foam Blends Marker.  Easy peasy!  Then splattered some coordinating ink on top!  I ALSO...wanted a little more pink tones on the card.  So...I colored a little spot with the Polished Pink Blends Maker onto Whisper White cardstock, stamped the greeting over it, and cut it out!  I LOVE that look and the fun color variation it gives! 

One more fun detail to point out...I added some glitter to the white part of the penguins with the Wink of Stella Glitter Brush.

So what do you think?!  What is your favorite detail?!  I love the glittery organdy ribbon and love that detailed die-cut in the background and the list goes on.  😀

Thank you so much for visiting!  Please let me know if you have any questions! I would love to help you with all your paper crafting needs!  If you need any Stampin' Up! products...let me know!

Contact: designwithink@gmail.com

Tuesday, October 19, 2021

Many Layered Blossoms + Watercoloring = Sweet 16!!!

When a very special person in your life has that magical "Sweet 16" birthday...and you are a card maker...you celebrate by making them a special card.  😁 I wanted it to be feminine, soft & pretty.  So here is what I came up with:

ColorsPetal Pink, Flirty Flamingo, Polished Pink, Whisper White, Gold
Inks: Petal Pink, Flirty Flamingo, Polished Pink
Cardstock/Papers: Whisper White, Vellum Cardstock, Fluid 100 Watercolor Paper, Gold & Rose Gold 6"x6" Metallic Specialty Paper, Whimsy & Wonder Specialty Designer Series Paper
Stamps: NONE!
Tools: Many Layered Blossoms Dies, Playful Alphabet Dies, Penned Flowers Dies (scallop edge)
Accessories: Opal Rounds

Some watercoloring, vellum floral background, gold, and pinks...hope she liked it!  I LOVE the Many Layered Blossoms Dies in the background.  I cut it out from Vellum Cardstock and it makes me happy.  😊 Here are a few more pictures of the details:


What's your favorite detail?  I love textures...so I really love this sweet little scallop edge.  And those glittered "bubbles"...swoon!  😍 (They are the Opal Rounds Embellishments.) 

One last view at the card:


Hope you enjoy!  Please let me know if you have any questions or need any help getting your hands on some fun Stampin' Up! products!  Would love to help you with all your papercrafting needs!

THANK YOU for visiting!

Contact: designwithink@gmail.com

Thursday, October 14, 2021

A Rainbow of Fancy Florals With Flowers of Friendship! Stampin' Fancy Friday!

It is Stampin' Fancy Friday time!  I LOVE being on this design team!  Every month there is a Stampin' Fancy Friday challenge and we post the cards we made for the challenge for inspiration!  Well...back in August, the challenge was Fancy Florals!  I love a good floral, so this was a fun challenge!  It was posted on IG and FB, but I am finally blogging about it!  Sorry for the delay!  But here is a Fancy Floral Rainbow for your viewing pleasure!  😉

ColorsPolished Pink, Pumpkin Pie, Daffodil Delight, Granny Apple Green, Coastal Cabana, Highland Heather, Gold, Whisper White, Basic Black
Inks: Polished Pink, Pumpkin Pie, Daffodil Delight, Granny Apple Green, Coastal Cabana, Highland Heather, VersaMark
Cardstock/Papers: Whisper White, Fluid 100 Watercolor Paper, Vellum, Gold & Rose Gold 6"x6" Metallic Specialty Paper
Stamps: Flowers of Friendship
Tools: Bark 3D Embossing Folder, Flowers & Leaves Punch, Heat Tool, Water Painters
Accessories: White Stampin' Emboss Powder, Genial Gems

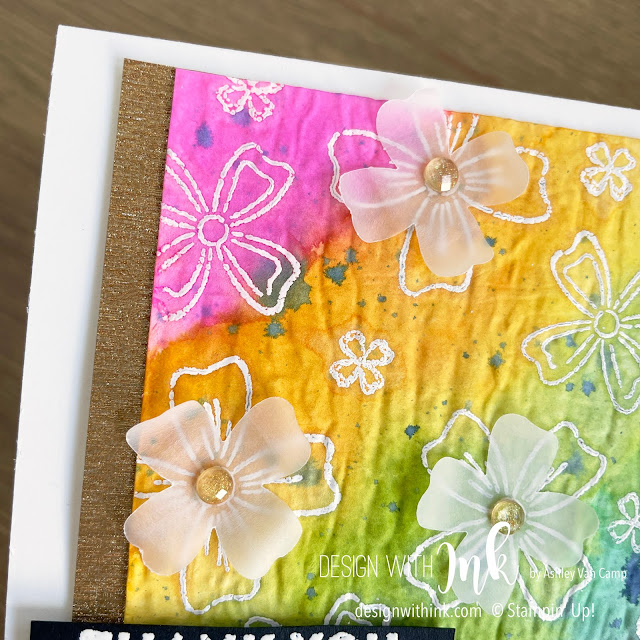
This rainbow was easily made by first stamp & emboss the floral images onto Fluid 100 Watercolor Paper.  Then just do a watercolor wash over the stamped images with your rainbow colors.  Then you use the Bark Embossing Folder to emboss the whole card front.  I used the punch to punch some flowers from vellum to add to the stamped flowers for dimension and texture.  Here are a whole bunch of pictures to show you the details! 


What do you think?!  Have you made any "Fancy Floral" cards lately?!  I want to see them if you have!  Tag us on social media if you make any!  Thank you so much for visiting.  Please let me know if you have any questions!  Would love to help you with any of your papercrafting needs!

Contact: designwithink@gmail.com


Monday, October 11, 2021

Haunts & Harvest Alternate...September Paper Pumpkin!

Last week, in THIS POST, I shared what I made with the Stampin' Up! September Paper Pumpkin Kit... Haunts & Harvest.  WELL...once the kit is made...don't overlook the full stamp set that you can use over & over again!!  Here is a fun card that I made with the stamp set to send to my Paper Pumpkin subscribers to say thank you!  (So if you are a Paper Pumpkin subscriber of mine...watch your mailboxes!  😀)  ***Note:  I used the Basic White Note Cards & Envelopes for this card.  I LOVE this size (3 1/2" x 5" finished) and I love that extra step of making the card base is done for me.  


ColorsFlirty Flamingo, Coastal Cabana, Mango Melody, Crumb Cake, Whisper White
Inks: Flirty Flamingo, Coastal Cabana, Mango Melody, Soft Suede (splatter), Memento Jet Black
Cardstock/Papers: Whisper White, Crumb Cake, Basic White Note Cards & Envelopes 
Stamps: Haunts & Harvest (from September 2021 Paper Pumpkin Kit)
Tools: Scissors!
Accessories: Simply Elegant Trim

Have to admit...love the stamp set a whole bunch!  It was fun to layer all of it together for a fun fall thank you card...in colors I love.  I'm not a huge fan of the "traditional" rusts, mustards, burgandy's of fall. This is much more my fall color palette.  (You will NEVER be able convince me of anything other than Coastal Cabana is most definitely a year-round color.  😉

Here are a few more pics of the details:


Love the layered fall leaves with some Gold Simply Elegant Trim behind it.  


Love the splatter, the distressed edges, the Coastal Cabana background stamping, etc!


I made a fun pile of these...and I have to admit (again) that seeing a stack of projects when they are all done makes my heart so happy!

Hope you enjoy this card! Please let me know if you have any questions on anything!  Would love to help you with any Paper Pumpkin needs...or any of your papercrafting needs!  Thank you so much for visiting!

Contact: designwithink@gmail.com

Thursday, October 7, 2021

Frightfully Cute Card Sketch - TGIF Challenge 337:

Happy Friday!  Yay!  And Friday in October!  Wowsers!  I can't believe it is already October of 2021!  WHERE has this year gone?!  Well today is the day for a new TGIF Challenge!  Who is excited?!  🙋And it is a Sketch Challenge!  Yay!!! (I love sketch challenges! 💕) I felt it fitting ... since it is October ... that I make a Halloween card for this Sketch Challenge.  Anyone agree?!  Well...I hope so because here is the card!

ColorsMagenta Madness, Bermuda Bay, Granny Apple Green, Whisper White, Basic Black
Inks: Magenta Madness, Bermuda Bay, Granny Apple Green, VersaMark, Light Pumpkin Pie Blends Marker
Cardstock/Papers: Magenta Madness, Bermuda Bay, Granny Apple Green, Basic Black, Pattern Party Designer Series Paper
Stamps: Frightfully Cute
Tools: Frightful Tags Dies, Parisian Flourish 3D Embossing Folder, Heat Tool
Accessories: White Stampin' Emboss Powder, White 1/4" Crinkled Seam Binding Ribbon, Cute Stars Adhesive-Backed Sequins

Now that you have seen the card...do you want to see the card sketch? 😀 I bet so because it is a CUTE one!!!  


I love this sketch!  You could do SO MANY fun things with it!  I can't wait to see what you make with it!  But here are a few more details with the card I made...


I distressed most of the edges because that seemed to fit in the "frightfully cute" theme.  Hee.  And I LOVE bright colors for Halloween.  (Well I love bright colors for most things.  Haha.)  But I just used the edge of my scissors or my fingernail to distress them.  I love the texture and detail that adds.

And can we talk about this spider web?!  I HATE spiders, but I LOVE this web!  It is from the Frightful Tags Dies.  I cut it out with from the Black Glitter Paper and it is SOOOOO Frightfully CUTE!  😍


You may be wondering what ribbon I used for this card.  Well...it is the White 1/4" Crinkled Seam Binding Ribbon!  But you are saying now, "But it's not white!" 😀 I know ... because I colored it!  I used the Light Pumpkin Pie Stampin' Blends Marker to add a bit of orange.  Then I pulled some fibers out of the ends of the ribbon to give it more FRIGHTFULLY CUTE vibes!  😉


I hope this card inspires you!  I hope it inspires you to create your own card with this sketch!  And then go post it on the TGIF Challenge Blog!  I can't wait to see what you make!  

Please let me know if you have any questions!  I would love to help you with any paper crafting needs!

Contact: designwithink@gmail.com

Sunday, October 3, 2021

September Paper Pumpkin Fun! Haunts & Harvest!

Are you a Stampin' Up! Paper Pumpkin Subscriber?!  If so...are you squealing over your kit that came in September?!  Or did anyone hear me squealing over mine?!  As soon as I opened it...I got to work!  Because how could you not?! Haha.  

(In case you aren't familiar...Paper Pumpkin is a monthly crafting kit subscription.  It comes with everything you need to make whatever the monthly project is.  Including the stamp set & ink!) 

In case you haven't seen it yet...I will share what I did with it!

First thing...my daughter just learned about Johnny Appleseed in school.  So I wanted to make some apples for her teacher!  

Aren't they cute?!  I wrapped these up in a cello bag and my daughter took them the next day.  (They had caramel apple candies inside.  SO MUCH FUN, huh?!  Hee.)

Then this part is a first for Paper Pumpkin...but they had a plan for the box the kit came in!  You turn it into a wagon to carry your treats!!!  HOW CUTE IS THAT?!?!?  Yeah...so stinking cute!  So I put it together, added the pumpkins...and I mean...COME ON!  Swooning!  😍


Just look at these cutie pumpkins!!!


Do you love them as much as I do?!  😉 If not yet, just look at HOW CUTE THEY ARE in this little wooden tray!!!


I have a few videos to show you!  The Take Your Pick Tool was a huge help in quickly putting together these treat boxes.  So made a quick video to try out some video making skills and show you how it helped!  


Then Stampin' Up! makes a video every month to show how to put the kits together.  So thought it would be fun to include here:


With a BONUS of the video on turning the box into the wagon!


Thank you for visiting!  Please let me know if you have any questions or need help with anything!  Including if you need help getting signed up for Paper Pumpkin!  😊 

Contact: designwithink@gmail.com

Bold Pop With Changing Leaves Bundle!

I had a vision in my head for a card, & couldn't get it out of my head ... so had to just create it.  Haha.  I LOVE the Changing Lea...