Saturday, April 26, 2025

The Greatest Fun! With The Artisan Design Team!

Hello!  Yes ... you read that title right!  We have more fun today in store ... you get to hop around with some of us on the 2025 Stampin' Up! Artisan Design Team!  Whoooo hoooo!!! 🙌  Today we are showcasing two stamp sets ... the He's The Greatest & She's The Greatest Stamp Sets!  They are ☆ NEW ☆ Online Exclusives just released this month and they are so much fun to use!  


I made a card for both a mom & a day, but you could easily swap out the greeting and make these cards for anyone!  Here are the stamp sets we used: 


Aren't these so much fun for the men & women in your life?!  Let me share some more pictures of each card so you can see more of the details: 


Here are a few fun details about this card: 

  • Use Two Tone cardstock, rip into strips, and layer together to add added texture and detail.  Stamp on one of the colors for added fun! 
  • Stamp the floral image repeatedly & then adhere in a circle to make a fun wreath! 
  • Watercolor on Fluid 100 Watercolor Paper.  Make it ombre to give it some variation.  Stamp (& emboss in this case) the part of your greeting you want highlighted.  
Now on to the next card: 


A few fun details about this card: 

  • Watercolor your colors of choice onto Fluid 100 Watercolor Paper.  Let dry.  Stamp & emboss on each color.  Use Everyday Arches to cut out your shapes and add as a fun geometric detail to your card! (See photo below for how I did the watercoloring/stamping.)
  • Stamp your greeting onto different colored cardstocks.  Cut out in strips & layer together to make another fun interesting element.  
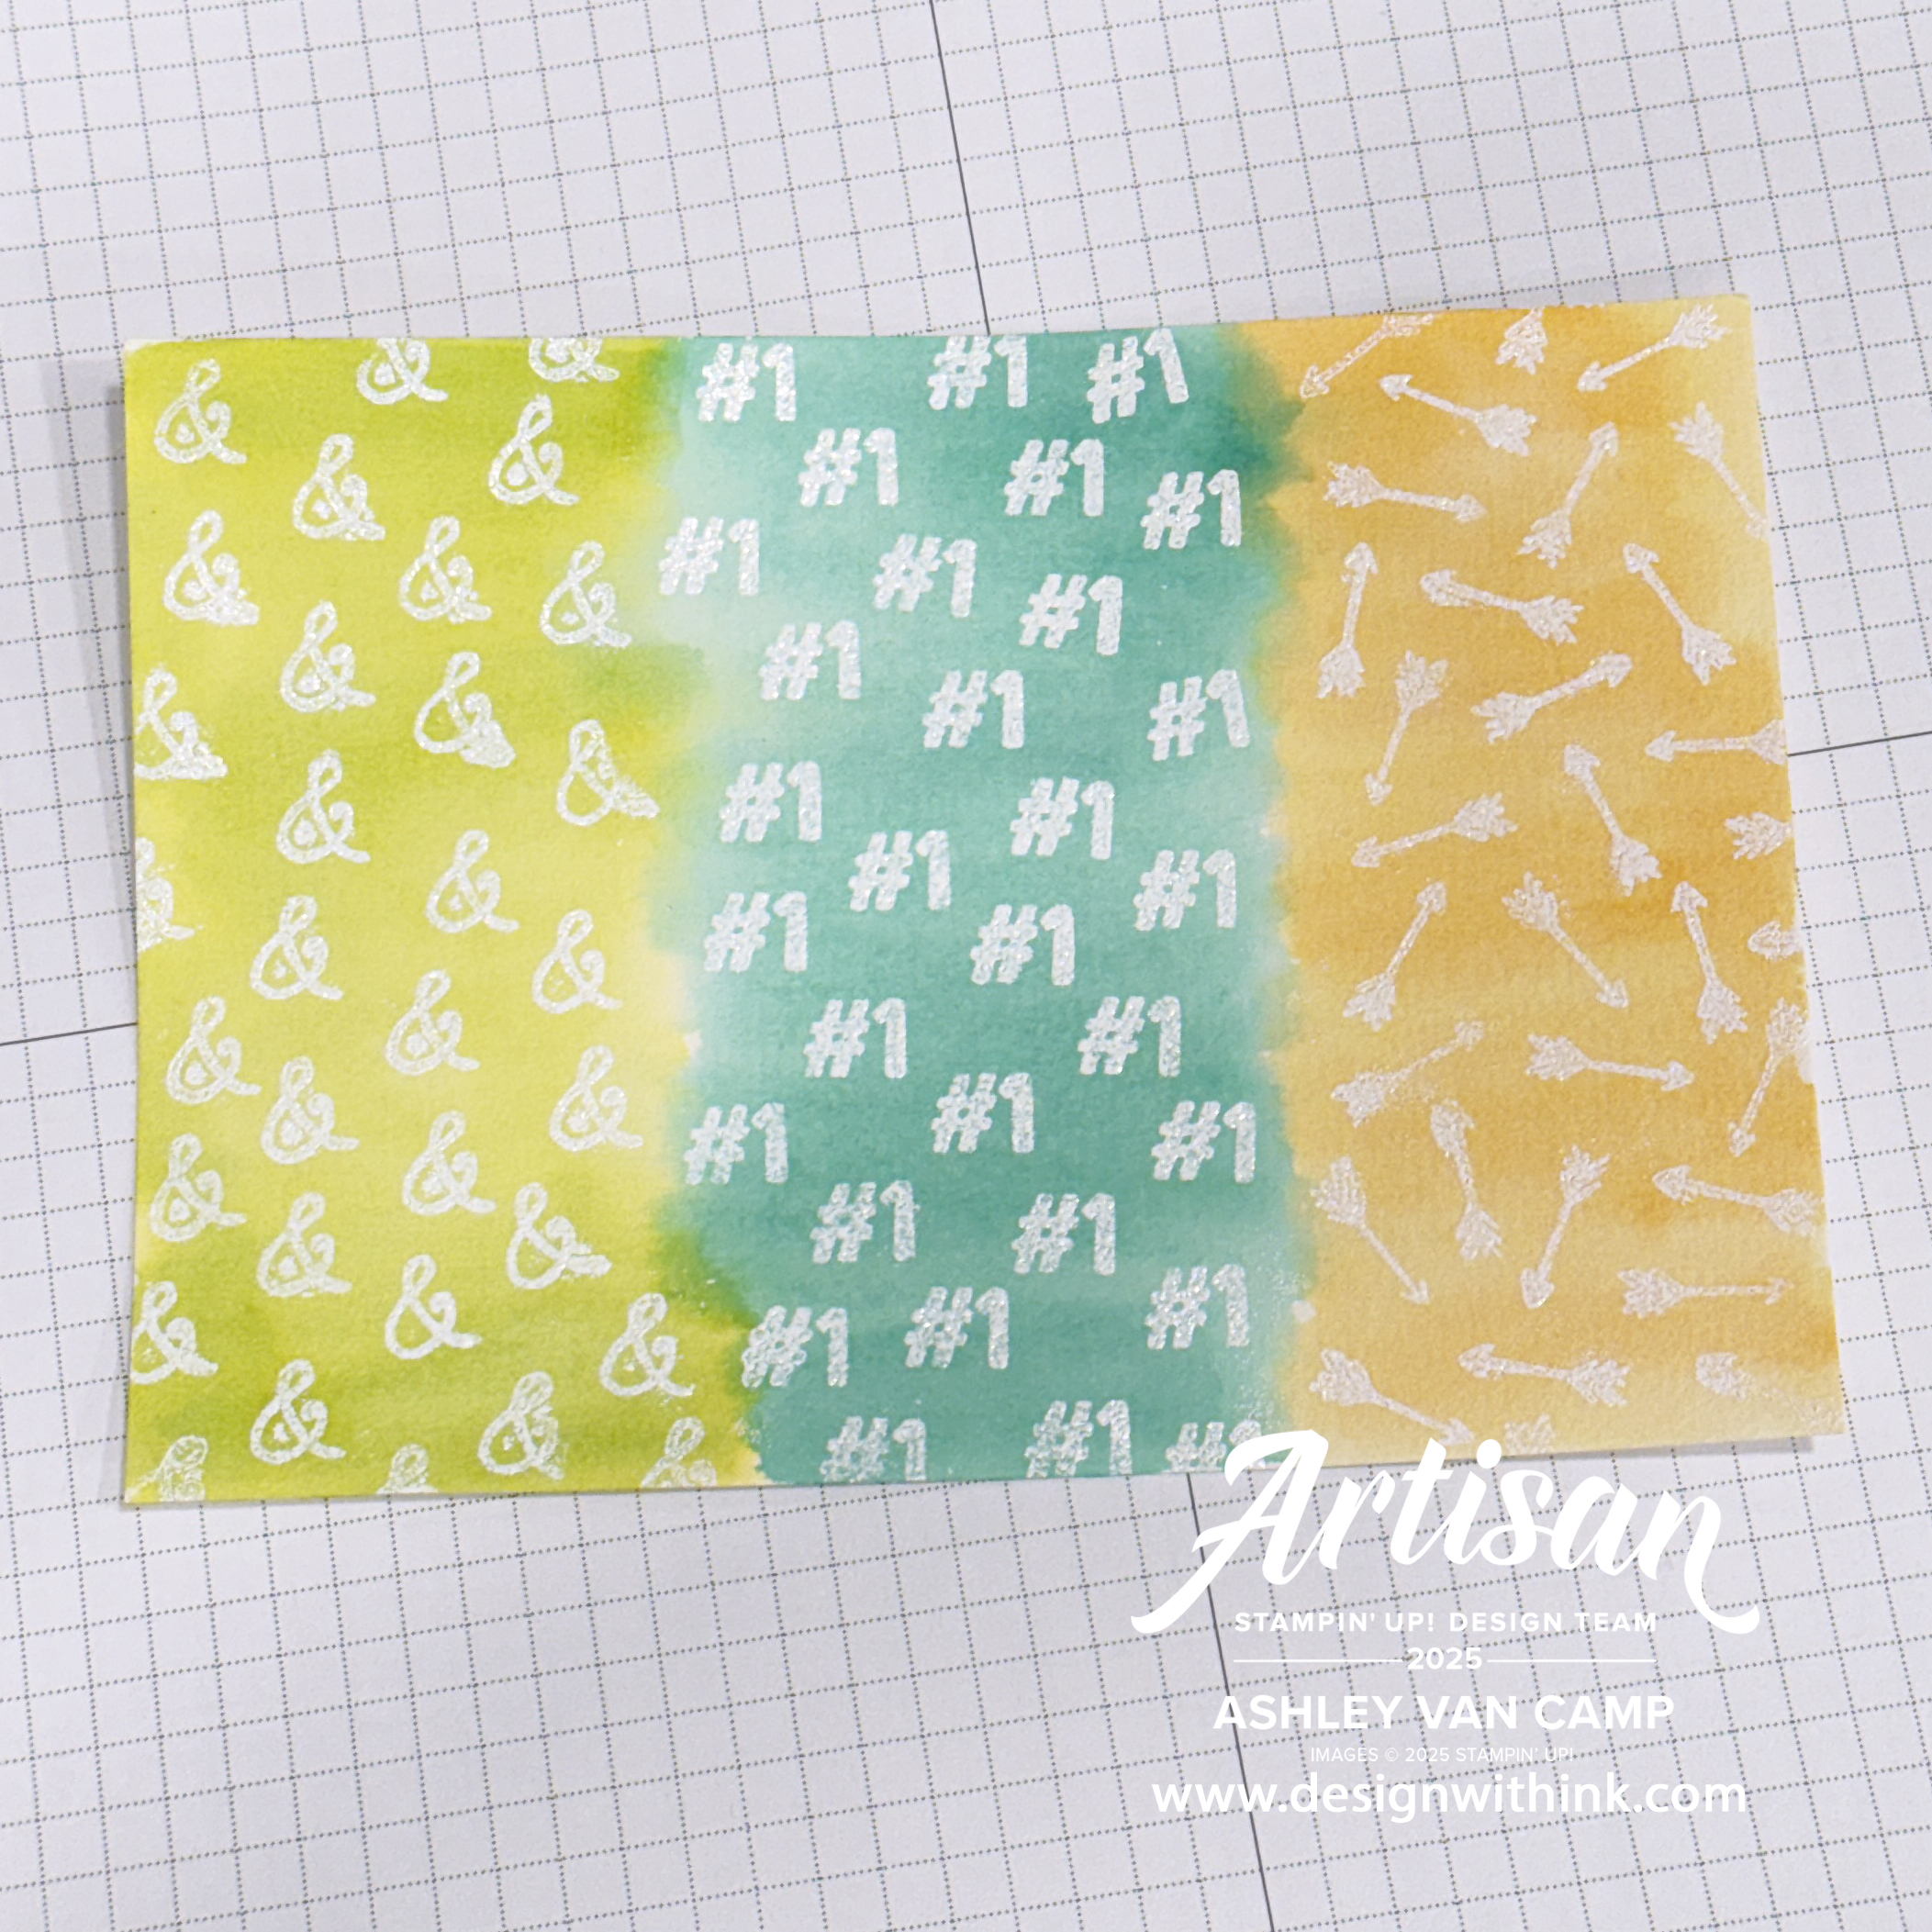
It was a lot of fun making these cards.  I hope you enjoyed seeing them.  Now you can keep hopping along to check out all the projects from the other Artisan Design Team Members that are sharing today!  You do NOT want to miss what everyone has in store for you!  

The best place to see them is on Instagram so here is the full hoppers list: 

  • Ashley Van Camp @designwithink   ☆ YOU ARE HERE! ☆
  • Cornelia Janssen @manufaktur_herzgemacht
  • Jay Soriano @mitosucrafts
  • Lara Moss @scrappykea
  • Sarine Zijderveld@sarinezijderveld
Thanks you so much for visiting!  Please reach out if I can help you with anything!  Would be happy to help you with all your papercrafting needs!  If you need to get your hands on these, or any, Stampin' Up! supplies ... happy to help there too!  Contact me any time! 

Contact: designwithink@gmail.com

Thursday, April 24, 2025

Unbounded Beauty & Botanical Textures Criss Cross Gift Pouch ...

Back in March when I went to Stampin' Up!'s On Stage event, I made a few different gifts.  Finally getting around to sharing one of them!  It's a cute criss cross card that I made into a gift pouch!  I used the Unbounded Beauty Designer Series Paper to make the pouch.  I then decorated it with the Everyday Arches, Thoughtful Wishes, & Country Flowers Dies.  (The Thoughtful Wishes Dies & Country Flowers Dies are both Last Chance items!  Get them while you can!) Then did the fun tab with the Keeping Tabs Punch & Stamp Set.  The greeting is from the ☆ NEW ☆  Pattern of Friendship Stamp Set!  I LOVE this stamp set! 

But on to the photos ...

All supplies are from ©️ Stampin' Up!

Colors:  Coastal Cabana, Pretty in Pink, Petunia Pop, Lemon Lime Twist, Gray Granite, Basic White
Inks: Coastal Cabana, Pretty in Pink, Petunia Pop, Memento Black, VersaMark
Cardstock/Papers: Coastal Cabana, Pretty in Pink, Petunia Pop, Lemon Lime Twist, Gray Granite, Basic White, Unbounded Beauty Designer Series Paper, Botanical Textures Designer Series Paper
Stamps: Pattern of Friendship, Keeping Tabs
Tools:  Thoughtful Wishes Dies, Country Flowers Dies, Everyday Arches Dies, Keeping Tabs Punch, Heat Tool
Accessories: Baker's Twine Essentials Pack, Linen Thread, Basics Wow! Embossing Powder, Iridescent Faceted Gems

How cute are these?!  I kinda really love them.  I used the Botanical Textures paper so I could make more of a "manly" version of it.  So you have some floral girly ones with the Unbounded Beauty and the Botanical Textures for a more bold manly one. 

Let's get a closer look at these!  I love using Designer Series Paper and projects that show you both sides of the paper.  This project does just that. 


How cute are these?!  Let me show you all the patterns!  And just say ... MAN I LOVE THIS GREETING!!! 
♡


Just a few more ... 


And then one last one ... 


So what do you think?!  I had so much fun making them!  I hope you enjoy seeing them!  Thanks so much for visiting!  I hope you enjoy and please let me know if you have any questions!  Would love to help you with all your papercrafting needs!  And would love to help you get your hands on any Stampin' Up! supplies! 

Contact: designwithink@gmail.com

Friday, April 18, 2025

Pastel Polka Dots With TGIF Challenge #521!

Time for another TGIF Challenge!  Woot!  This is a fun theme of pastel polka dots!  Ahhhh!  We, the TGIF Design Team, are excited to show you what we made.  But we especially can't WAIT to see what you make!  

I love polka dots, and decided to make some textured polka dots for my card! 

All supplies are from ©️ Stampin' Up!

Colors:  Pool Party, Flirty Flamingo, Lemon Lime Twist, Basic White
Inks: Pool Party, VersaMark BLENDS: Pool Party, Flirty Flamingo, Lemon Lime Twist, Granny Apple Green
Cardstock/Papers: Pool Party, Basic White, Basic Black
Stamps: Memorable Blooms, Pattern of Friendship
Tools:  Memorable Blooms Dies, Around It All Dies, Everyday Arches Dies, Plaster Painting Embossing Folder, Blending Brush, Heat Tool
Accessories: Baker's Twine Essentials Pack, Basics Wow! Embossing Powder, Iridescent Faceted Gems

Pretty much love how these turned out.  All the supplies I used are from Stampin' Up! I used the Around It All Dies for the polka dots, embossed with the Plaster Painting Embossing Folder.  And fun fact ... the only blue cardstock I used was Pool Party.  So how are the polka dots lighter than the background they are on if it's also Pool Party cardstock?  Well ... I just took a Blending Brush and blended a little ink onto the cardstock!  I did it this way just to make them "pop" off the card a bit more ... to highlight the inspiration for this card.   
 
All in all ... love how it turned out!  This it is a fun way to make a fun background!  Super love these Everyday Arches Dies also.  Hee.  


Thank you so much for visiting!  Now ... go check out what the other designers made.  Then play along with us!!!  It is all happening on the TGIF Challenges Blog! 

Please let me know if you have any questions or need any help with anything!  Would love to help you with all your papercrafting needs!  Also would love to get you hooked up with any Stampin' Up! supplies that you need!  So please just let me know!  

Contact: designwithink@gmail.com

Tuesday, April 15, 2025

Textured Notes & Everyday Arches Birthday!

Birthday card time!  Here is a fun birthday card packed with lots of little details!  I used the Textured Notes Stamp Set, Everyday Arches Dies, & the Wanted to Say Dies (these are a LAST CHANCE item!  So get them while you can!) from Stampin' Up! 

All supplies are from ©️ Stampin' Up!

Colors:  Basic Beige, Pretty in Pink, Pool Party, Basic White
Inks: Pretty in Pink, Misty Moonlight (for splatter), BLENDS: Pool Party
Cardstock/Papers: Basic Beige, Basic White, Gold Mercury Vellum, Fluid 100 Watercolor Paper
Stamps: Textured Notes
Tools:  Everyday Arches Dies, Wanted to Say Dies, Exposed Brick Embossing Folder, Forever Plaid Embossing Folder, Heartfelt Hexagon Punch, Water Painters
Accessories: Baker's Twine Essentials Pack, Summer Splash 3/8" Bordered Ribbon, Iridescent Faceted Gems

Some of the details I want to point out: 

  • Arch die-cut is upside down to make more of a pennant.
  • Watercolor wash with stamping & splatter over it gives such beautiful texture without a bunch of layers.
  • Die-cutting words then using Blends to add some "dipped" color is a fun & easy way to add interest.
What other details do you love?!


I hope you enjoy this card!  Thank you so much for visiting!  Please let me know if you have any questions or need help with anything!  Would love to help you with all your papercrafting needs!  And if you live in the United States, I am happy to help you get the Stampin' Up! supplies that you need!

Contact: designwithink@gmail.com

Saturday, April 12, 2025

Use Your Stash Hop ... With Polished Pink!

It's another Use Your Stash Hop day!  Yay!  This time ... it is all about our fave Stampin' Up! retired colors!  I have to admit ... I kinda love when Stampin' Up! does a color refresh on their colors.  And I also LOVE having the annual In Colors rotation!  But it does create for a "longing" of colors sometimes.  Hee.  So I was happy to use POLISHED PINK! for this hop today!  And I am so hopeful that we will see this color come back in the next color refresh.  (A girl can dream. Hee.)  

Without further ado ... here is a little Polished Pink love for you! 

All supplies are from ©️ Stampin' Up!

Colors:  Polished Pink, Lemon Lime Twist, Pretty in Pink, Petunia Pop, Lemon Lolly, Basic Black
Inks: Pretty in Pink, Lemon Lolly, Lemon Lime Twist, Petunia Pop, Memento Black, VersaMark
Cardstock/Papers: Polished Pink, Basic Black, Fluid 100 Watercolor Paper
Stamps: Mixed Florals
Tools:  Mixed Florals Dies, Mini Corrugated Embossing Folder, Water Painters, Heat Tool
Accessories: Baker's Twine Essentials Pack, Basics WOW! Embossing Powder, Iridescent Faceted Gems

Isn't she just so lovely?!  😍  I love this color!  I added this gorgeous floral image from the Mixed Florals Bundle from Stampin' Up!  I used black embossing powder to emboss the image and then watercolored it with Pretty in Pink, Lemon Lime Twist, Petunia Pop, & Lemon Lolly inks.  

I really love the florals on the embossed Mini Corrugated background.  Here are a few more pics to show the details ... 


Now ... the fun part of hops ... you get to go check out lots more inspiration!  The best place to see them all is on Instagram so head on over there to play along!  Here is the full list of hoppers!

@i.heart.stamps
@hammondandpenny
@cindy_schuster
@simple_stamper
@vickiboucher
@bellestampinwithann
@craftsomnia
@stampin_met_monique
@sleeplessstamper
@simplyfairies_kimfee
@designwithink  ☆ THIS IS ME!! ☆

Thanks so much for visiting!  I hope you enjoy!  Please let me know if you have any questions or need help with anything!  Would love to help you get any Stampin' Up! supplies you may need (if you live in the United States), so let me know how I can help!  

Contact: designwithink@gmail.com

Wednesday, April 9, 2025

Swapping with the Stampin' Up! Artisans at On Stage 2025!

When I was in Raleigh last month for Stampin' Up!'s On Stage convention, we got together as Artisans (past & present!) and did a card swap.  This is where each participant makes one card for each person participating.  Then you "swap" them, and you end up with a bunch of different cards!  How much fun, right?!  Swapping is always a part of Stampin' Up! events, and it is super fun to do one with my fellow Artisans.  Because as the saying goes ... "Once an Artisan, ALWAYS an Artisan!"  

So today I am sharing the swap I made for this! 

All supplies are from ©️ Stampin' Up!

Colors:  Coastal Cabana, Melon Mambo, Calypso Coral, Lemon Lime Twist, Basic Black, Basic White
Inks: Melon Mambo, Calypso Coral, VersaMark
Cardstock/Papers: Coastal Cabana, Lemon Lime Twist, Peach Pie, Basic White, Friends of the Ocean Designer Series Paper
Stamps: Ocean Friends
Tools:  Everyday Arches Dies, Ocean Friends Dies, Soft Waves Embossing Folder, Heat Tool
Accessories: Linen Thread, Basics WOW! Embossing Powder, Iridescent Faceted Gems

I can't get enough of this Ocean Friends Bundle!  I felt like my Artisan friends needed to meet my Ocean Friends!  Hee.  I also love the Everyday Arches Dies ... and used those to add a fun pop of the Friends of the Ocean Designer Series Paper! 😍

Without further ado ... a few more pics so you can see all the details!  There are lots of ocean friends throughout the Designer Series Paper, so I fussy cut some of those out and added one to each card.  The dies are fabulous and that coral is AMAZING!  Will never get over using that.  And yeah ... just really love this whole suite of products!  Hope you have it ... because if you don't ... get it NOW!  It is on the Last Chance list! So that means that once it is gone, it is gone! 


I hope you enjoy this card!  Here is a pic of those of us that gathered in Raleigh and swapped together! 


I love these humans!   Thank you so much for visiting!  Please let me know if you have any questions and if I can help you with any of your papercrafting needs!  I would love to!  I would love to help you get any Stampin' Up! supplies you need ... ahem, the Ocean Friends Bundle?!  Hee ... so don't hesitate to reach out! 

Contact: designwithink@gmail.com

Friday, April 4, 2025

Colorful Around It All Polka Dot Birthday ... TGIF Challenge #519!!

YAY!  We have a fun color challenge for you this week for TGIF Challenge #519! It is the perfect colors for lots of things and I think especially very "spring" vibes ... but I made a textured birthday card with it!  

All supplies are from ©️ Stampin' Up!

Colors:  Flirty Flamingo, Pool Party, Lemon Lolly, Basic White, Gold
Inks: Flirty Flamingo, Pool Party, Lemon Lolly, VersaMark
Cardstock/Papers: Flirty Flamingo, Pool Party, Lemon Lolly, Basic White, Fluid 100 Watercolor Paper
Stamps: Elements of Text, Arched Wishes, Pattern of Friendship
Tools:  Around It All Dies, Plaster Painting Embossing Folder, Heat Tool
Accessories: Antique Pearls, Baker's Twine Three Color Pack

Can you pick out the colors?  Well ... here they are in a cute little graphic for you!  This week's color challenge! 


I added lots of texture in a few different ways.  I first cut out a bunch of circles using the Around It All dies from Stampin' Up!  I wanted to make a polka dot background.  But before I adhered them to the background Basic White cardstock - I used the Elements of Text Stamp Set to stamp on the circles.  😍  Then I just adhered down and embossed the whole card front with the Plaster Painting Embossing Folder!  Look at all this fun texture! 

For the greeting ... I embossed it, cut it out, & then used a blending brush to add a bit of Flirty Flamingo ink to it.  The balloon is stamped on watercolor paper, embossed, and then watercolored.  


Love how all these colors work together and all the elements come together to make a fun & celebratory card for someone special!  

Thank you for visiting!  Now you can head on over to the TGIF Challenge Blog to see what the rest of the design team made for you & then to play along with us!  We can't wait to see what you make! 

If you have any questions ... please don't hesitate to let me know!  Also ... I would love to help you get your hands on any Stampin' Up! supplies that you need (if you live in the United States)!  

Contact: designwithink@gmail.com

Tuesday, April 1, 2025

Artisan Extra! With a Memorable Blooms Wreath!

This is still so much fun to me!  It is so much fun being on the Stampin' Up! Artisan Design Team.  A couple weeks ago ... this project I made was posted by Stampin' Up! So guess it's past time to get it posted here!  

I made a home decor wreath with the Memorable Blooms Bundle!  I LOVE this bundle and it was fun to pair with the Floral & Gingham Vellum Specialty Designer Series Paper & Spotlight on Nature Dies.    

All supplies are from ©️ Stampin' Up!

Colors:  Lemon Lolly, Pool Party, Granny Apple Green, Old Olive, Gray Granite, Basic White
Inks: Wild Wheat, VersaMark  BLENDS MARKERS: Granny Apple Green, Old Olive, Pretty In Pink, Pool Party
Cardstock/Papers: Thick Basic White, Basic White, Old Olive, Granny Apple Green, Lemon Lolly, Floral & Gingham Vellum Specialty Designer Series Paper
Stamps: Memorable Blooms
Tools:  Spotlight in Nature Dies, Memorable Blooms Dies, Heat Tool
Accessories: Basics Wow! Embossing Powder, Basic Beige 3/8" Bordered Ribbon, Iridescent Faceted Gems 

What do you think?!  Want to know how to create one yourself?!  Well let me show you the few steps it takes to make it! 


BONUS PIC:  This is what it will look like after you have adhered the 4 remaining hexagons to the wreath.


A few more bonus pics of some of the details!  And look at how cute this whole Memorable Blooms Bundle is! 


After you color your floral image, add some of the leaf die-cuts, your greeting & another circle from the Spotlight on Nature Dies.  This makes your focal point for the wreath!


How cute is it on the wreath?! 😍😍😍


It is so easy to make the little ribbon hanger.  Just cut about an 8" piece of the Basic Beige 3/8" Bordered Ribbon.  Make a little loop with it & adhere it to the back.  Then tie a large bow with the same ribbon and adhere that to the base of the ribbon loop.


Here is the back of the wreath when it's all done:


Then a pic of the final wreath for one more view of it...


It is an easy project, but so much fun!  And you can easily change this up using whatever paper you want & decorate it however you want!  

Hope you enjoy!  Thank you so much for visiting! Please let me know if you have any questions!  Or need help getting any Stampin' Up! supplies!  Would be happy to help you with your papercrafting needs!  

Contact: designwithink@gmail.com

Use Your Stash! With Sunny Summer Fun!

Today is a fun Use Your Stash Hop! with a super fun theme ... Sunny Summer!  So I went all in!  I used the Rays of Light and Sharing Sunshin...