
| Cindy Jamie Jackie Patty | Katy Melissa Tina Kelly | Ashley Carmen Monika Tracy | Sam Jenn Renee Carrie |

| Cindy Jamie Jackie Patty | Katy Melissa Tina Kelly | Ashley Carmen Monika Tracy | Sam Jenn Renee Carrie |
 SO HANDSOME he is!!! Love this kid! Around that Crushed Curry circle in the top right corner are some fun silver brads...
 I love the "manly" accent that adds!
  I used the Top Note in Bashful Blue to add a bit of interest and then also used some Silver Hodgepodge to tie in the silver brads. Once again, I used a Corduroy brad for some more texture. Can I say one more time that I LOVE THOSE THINGS!!!! :) ...
 Then here you can see my glossy letters. I cut out the letters using my Simple Letters dies and the Big Shot. Then I put Crystal Effects all over them to give them that 3-D glossy look. LOVE these things! :) ...
  I had a ton of fun making this page and hope you enjoy it! Thanks SO MUCH for all your comments/emails on my Artisan projects! You are awesome!!!! And thanks for visiting! :)
 This time it's a fun and cheery card. The flower is from the "Petal Pizazz" stamp set, the stem for the flowers is from the "Sweetheart" set (that is sold for the Heart Sweet Treat Cups. It isn't in a catalog...but you can still get it!), and then the saying is from the set "Stem Sayings." Here's a close-up for you...
 Then for the inside of the Sweet Treat Cups I used some fun beads. I used the Pumpkin Pie and Pretty in Pink brads. I also stamped another flower from the "Petal Pizazz" set in Pumpkin Pie ink on Pumpkin Pie cardstock for the background of the Sweet Treat Cup. So as you shake the card...you can see that flower in the background.
 Then the saying is embossed with Chocolate Chip craft ink and Clear Embossing Powder. Everything is sponged as well to make it pop.
 (The letters are cut out of textured cardstock and sponged with Pretty in Pink ink.) For the "at me" part of the title...I stamped and cut those letters out (the alphabet is the Contempo Alphabet) and then put a layer of crystal effects on them. I LOVE this look. It gives them a glossy glaze, makes them 3-D and is just gorgeous! (On my other scrapbook pages I did the same thing with the bigger letters so you will be able to tell more with those. :) ) Then the background of the "at me" piece I ran through the Big Shot with the Perfect Polka Dot embossing folder. Then of course...sponged the edges. And gotta love those Corduroy buttons! They add so much texture and I LOVE using those!...
 Here is another shot of that fun ribbon technique. What I did for this was put a strip of Sticky Strip down the page and then just folded the ribbon sticking it to that to make it look like this...
 The satin ribbon is SO BEAUTIFUL and looks SO good! The arrows on the page I ran through the same Perfect Polka Dots embossing folder. And then used Very Vanilla Jumbo Brads. And take a look at my daughter's face as she goes down. TOO CUTE!!! (If I do say so myself! :) ) ...
 Now look at those sweet little feet. :) Love them. Now on to that ruffly edge. (That patterned paper on the page actually matches my daughters dress almost PERFECT! So exciting!!! :) ) I took a few strips of the Designer Series Paper (oh...and it's from the Positively Prints pack in the Build-A-Bear collection. I love the prints in that and use them for lots of things that have nothing to do with Build-A-Bear!) and used the Eyelet border punch to make the decorative edge. Then did basically the same thing as I did with the ribbon. Laid down a strip of sticky strip and just folded it over on each other to get that look...
 The colors of the page are Regal Rose, Pretty in Pink, Old Olive, and Very Vanilla. I hope you enjoy this page! I know I love it and it kinda makes me sad that the judges didn't. :) (OK...I know they could have loved it too. I know they had a SUPER hard time picking because there are lots of fabulous stampers out there that entered! So it's ok that I didn't win. (At least I'm trying to be ok about it. :) ) I'm excited for those that did for sure though. :) ) But I do hope you enjoy and thanks so much for visiting!!!
 This card was made with one of the pages of the On Board Scallop Circle book from the Occasions Mini catalog. So...the big scallop in the background is chipboard. I LOVED this card. It's sad because all of these projects look SO much better in real life. But I'll never have them in my hands again. :( Stampin' Up! keeps all the projects you submit...so they are gone forever. But oh well. At least I remembered to take pictures. :) Oh...and all this stuff that I used is from the Game Night collection in the main catalog. Here are some close-up details...
 I cut out the card with my Big Shot and the Clear Circle die. I embossed EVERYTHING that I stamped and then I also sponged all the edges of everything with whatever color cardstock I used. So things really popped in real life. I loved the dice in the background that I embossed. I just stamped in Basic Black craft ink on Basic Black cardstock. The embossed with clear embossing powder. The game pieces I stamped with either So Saffron craft ink or Real Red craft ink.
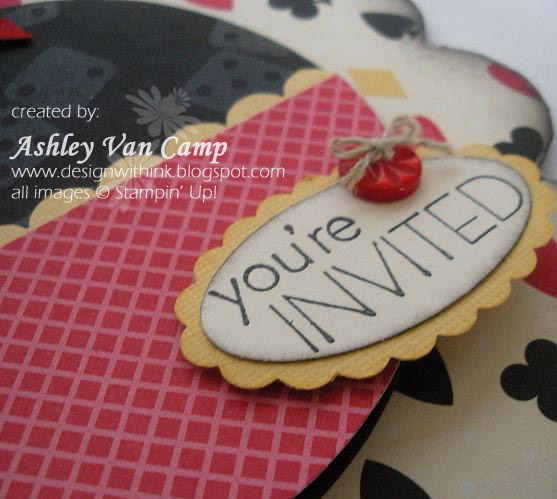 I LOVE textured cardstock! I think it makes SUCH a difference. I would use it ALL the time if it was sold in packs like the smooth is. :) Here is the card opened up...
 And some close-up's...
 This card really made me want to have a game night so I could make some invites. :) It was so much fun! I hope you enjoy! Feel free to leave me any comments that may make me feel better for not winning! :) Thanks for visiting!!


 Card Stock: So Saffron, Tempting Turquoise, Old Olive, Whisper White
 Stamps: On Your Birthday, Tropical Party
 Cardstock: Old Olive, Tempting Turquoise, Whisper White
 HOW CUTE!!!! There were some dimensionals and pop-up glue dots in the cello. SERIOUSLY cute!!! :) Here is the little caterpillar close up...
 Don't you just love him! :) The colors are Green Galore and Gable Green (with some Basic Black, Real Red, and Whisper White in there) so if you want to make him...better do it before these colors are gone! :) (They are two of the ones retiring with the Color Renovation.) I think he is just precious! Hope you enjoy!!!! Thanks for visiting!
 This was a tough card to photograph...but trust me when I say it's tons of fun! When I got my new supplies from the SUMMER MINI , I sat down to play one day. Well I LOVED this card so much and I wanted my club girls to make it. However...it took a bit too much time for a club card. So I adapted it a bit and came up with the club card we did this month. But you still get to see this version as well! The outside part of the card is a "frame" in Kraft (I cut out the middle) with a window sheet covering the frame. And I spritzed the front with Log Cabin Smooch Spritz before I put the window sheet on. :)
Then this is the inside: The three ice cream scoops are all done with the same "rock and roll" technique we did. (The blue is Tempting Turquoise rolled in Taken With Teal, pink is Regal Rose rolled in Rose Red, and the green is Certainly Celery rolled in Old Olive.) And the cones are all Close to Cocoa rolled in Chocolate Chip. I also spritzed the whole thing with the Vanilla Shimmer Smooch Spritz. SO PRETTY! :)
 Here is a photo of the layers...
 I hope you can tell how this card works. I had a lot of fun making this card and hope you enjoy as well! Thanks for visiting!
  How cute?! :) Now...look closely at the ice cream...
 We did the "Rock and Roll" technique. What we did was ink up the ice cream scoop in Certainly Celery ink. Then we "rolled" the edges in the Old Olive ink to get the darker outside edge. LOVE IT! Then with the cone we inked it up in Close to Cocoa and rolled those edges in Chocolate Chip. This is a super fun technique so go try it! :) The background is spritzed with the Log Cabin Smooch Spritz spray! SO pretty in real life!
  It's a purse made out of a lunch bag! I have seen these around for awhile so finally tried one myself! How much fun! (By the way...can you tell how much I am in the mood for SUMMER?!?! :) ) Here is a side view so you can see the paper bag...
 Oh I forgot to take a picture of it opened! Shoot! But the flap is held down with some velcro. Here is a close-up of the focal point...
 We used those YUMMY Filigree brads! (That you can get FREE this month by purchasing certain stamp sets. Click on this link to see the list... http://www.stampinup.com/us/documents/ScrapbookingMonthPromo_0410_US.pdf ) And then we even decorated the back a bit...
 Here is the info for this project:
Today is a fun Use Your Stash Hop! with a super fun theme ... Sunny Summer! So I went all in! I used the Rays of Light and Sharing Sunshin...


