Pages

Wednesday, December 27, 2023

Christmas Packaging!

Just a quick post to share a fun tag idea that I used this year for Christmas, in a few different ways.  You could easily switch out the greeting and use all winter long!  Or leave "Merry" because merry can apply for the whole year!  Hee.  😁

First up - I did a few on the Classic Gift Card Envelopes.  I LOVE these things so much!  Then on the back, I used the Modern Oval Punch to be able to write a little holiday greeting to the recipient.  They perfectly fit a gift card, cash, or even a note that you tie to a treat!  All supplies are from Stampin' Up!


Colors Melon Mambo, Coastal Cabana, Whisper White
Inks: Melon Mambo, Coastal Cabana, Basic Gray (splatter)
Cardstock/Papers: Basic White, Fluid 100 Watercolor Paper
Stamps: Merry & Bright
Tools:  Forever Forest Dies, Cheerful Daisies Dies (label), Modern Oval Punch, Water Painter
Accessories: Classic Gift Card Envelopes, Linen Thread, Adhesive-Backed Snowflake Assortment

I also added some of the fabulous trees from the Forever Forest Dies to some watercolor paper with a pink watercolor wash and tied it to some packages with some fun ribbons! 


Colors Melon Mambo, Coastal Cabana, Whisper White
Inks: Melon Mambo, Flirty Flamingo, Coastal Cabana, Basic Gray (splatter)
Cardstock/Papers: Basic White, Fluid 100 Watercolor Paper
Stamps: Merry & Bright
Tools:  Forever Forest Dies, Cheerful Daisies Dies (label), Modern Oval Punch, Elegant Edge Tag Topper Punch, Water Painter
Accessories: Classic Gift Card Envelopes, Linen Thread, Adhesive-Backed Snowflake Assortment, retired ribbons


Thanks for stopping by and visiting! Hope you enjoy and it gives you some holiday inspiration!  Or any time of year inspiration! 💗  Please let me know if you have any questions or need help with any of your papercrafting needs.  Would love to help you get any Stampin' Up! supplies you need! 

Contact: designwithink@gmail.com

Monday, December 18, 2023

Simply Sparkling Meets Classic Gift Card Envelopes!

 Have you checked out Stampin' Up!'s Online Exclusives lately?  There is a FABULOUS new bundle called Simply Sparkling that is SO! MUCH! FUN!  And have you seen the Classic Gift Card Envelopes in the Holiday Mini Catalog?!  Well - I have been using those LOTS this holiday season!  What do these have in common?!  Let me show you!

I live in Utah in the United States, and we are somewhat well known for our "soda shops" here.  There are lots of them and they all sell so many types of flavored sodas and stuff.  And there are always busy!  So - I got a bunch of gift cards to give to teachers, coaches, etc to show a small piece of our appreciation for all that they do for our kids.  (Enter the gift card envelopes. 😃)  What better way to decorate them than with the Simply Sparkling Bundle! 😍  Then I just punched a hole in the top scallop flap (instead of tucking it in like it can be done), and tied it on to a cute sode bottle! 


Colors Melon Mambo, Whisper White
Inks: Melon Mambo, Parakeet Party, VersaMark
Cardstock/Papers: Basic White, Basic Black, Fluid 100 Watercolor Paper, Holographic Trio 12x12 Speciality Paper
Stamps: Simply Sparkling
Tools:  Simply Sparkling Dies, 
Accessories: Classic Gift Card Envelopes, retired ribbons

Like seriously ... aren't these so much fun!  Then the gift card is right inside that envelope / now tag.  Hee.  I love these even more than I thought I would.  Haha.


I used the Holographic Trio Speciality Paper to die-cut the top and bottom lid pieces, and OH! MY! HEAVENS!  It is PERFECTION and STUNNING!!!  10 out of 10 would recommend! 

(Although I do apologize for my photography!  I finished these ones up at night, right before my daughter had to take them to her tumbling teams Christmas party.  So just had to quickly grab a few photos with whatever lighting I had.  😃)

Look how cute she is all packed up ready to go with them! 


Here are a few more pics:


Seriously so much fun!  But - the gift card envelopes are retiring soon!  Grab them before they are gone.  Best part - they are ON SALE.   You can get 20 envelopes for just $4.20! (This is in US dollars.)  And then grab that darling bundle if you haven't yet! 😁  Just look how cute they both are! 


I hope you enjoy this!  Please let me know if you have any questions or need any help getting your hands on any of these, or other, Stampin' Up! products!  I would love to help you with all your papercrafting needs!  Please reach out if you need help with anything!

Contact: designwithink@gmail.com

Friday, December 15, 2023

Celebrate With Tags & White Christmas TGIF Challenge #451!

It is White Christmas inspiration challenge with TGIF Challenges this week!  Now ... let it be known ... I don't really like snow.  Sure, I love nature so I can find things I like about it.  But generally speaking ... give me the sun & warmth.  😃  So my favorite "White Christmas" is a white sand Christmas.  Haha.   I was going to go that direction for this challenge, but then I ultimately decided to just lean into the true "White Christmas" meaning.  AND ... since it is SO CLOSE to Christmas - I went quick & simple for this card!  (All supplies are from Stampin' Up!)

Colors Bubble Bath, Coastal Cabana, Whisper White
Inks: Bubble Bath, Coastal Cabana
Cardstock/Papers: Basic White
Stamps: Celebrate With Tags
Tools:  Snowflake Sky Embossing Folder
Accessories: Neutrals Adhesive-Backed Sequins, Baker's Twine Essentials Pack

There are just a couple of images, a greeting, and a few little things to make it pop.  I only used one stamp set & one color of cardstock also!  And two ink pads!  Then one easy "technique" is using the Snowflake Sky Embossing Folder to make a DEBOSSED look.  No extra work - just emboss that cardstock and flip it around! 😂 And VOILA!  A debossed snowflake sky!  Hee.  (Can't really call that a technique, I guess.  Haha.) I really like how it looks though.

And I do love these cute little pink mittens.  😍


I hope you enjoy this card!  Thank you so much for visiting!  No matter what you do or don't celebrate this time of year, I hope you have a magical season as this year winds down.  And now you just need to head on over to the TGIF Challenge Blog to play along with us this week!  I can't wait to see what you are inspired to make! 💕

Thank you so much for visiting! Please let me know if you have any questions!  I would love to help you with your papercrafting.  And I would love to help you get your hands on any Stampin' Up! supplies you may need!  So please just reach out if you need help!

Contact: designwithink@gmail.com


Thursday, December 7, 2023

Whale Watching Fun!

The other weekend, I was fortunate to attend a fun team retreat that my upline in Stampin' Up! put on.  I have more I want to share on this retreat, because it was SO! MUCH! FUN! But for today I am sharing the card I designed for a stamp class we did at the retreat.  (The other cards we made during this class is part of what I will share later also! 💗)  If you know me, you know I love the ocean.  So yes...I jump at anything ocean themed.  Hee.  So yes!  I ♡ LOVE ♡ the Whale Watching Stamp Set in Stampin' Up!'s Mini Catalog

Colors Lemon Lolly, Coastal Cabana, Flirty Flamingo, Basic White, Basic Black
Inks: Lemon Lolly, Coastal Cabana, Memento Black
Cardstock/Papers: Basic White, Flirty Flamingo
Stamps: Whale Watching, Charming Sentiments, Rays of Light
Tools:  Nested Essentials Dies, Blending Brush
Accessories: Linen Thread, Brushed Metallic Adhesive Backed Dots

I liked this layout because it is an easy one to swap anything around to use the supplies that you have at home to recreate it.  Although - why would you want to because just LOOK at those cute orcas!  Hee.  (And shout out to the FABULOUS Rays of Light Background stamp.  MY FAVORITE!)


On the background of the banner piece, I stamped the ocean waves repeatedly, and then used a Blender Brush to blend some Coastal Cabana ink.  


And seriously - THE RAYS OF LIGHT background! I LOVE LOVE LOVE!   Hee. 


I hope you enjoy!  Thank you so much for visiting!  Please let me know if you have any questions on anything!  Would love to help you with all your paper crafting needs! And would also love to help you get any Stampin' Up! supplies that you need!

Contact: designwithink@gmail.com

Friday, December 1, 2023

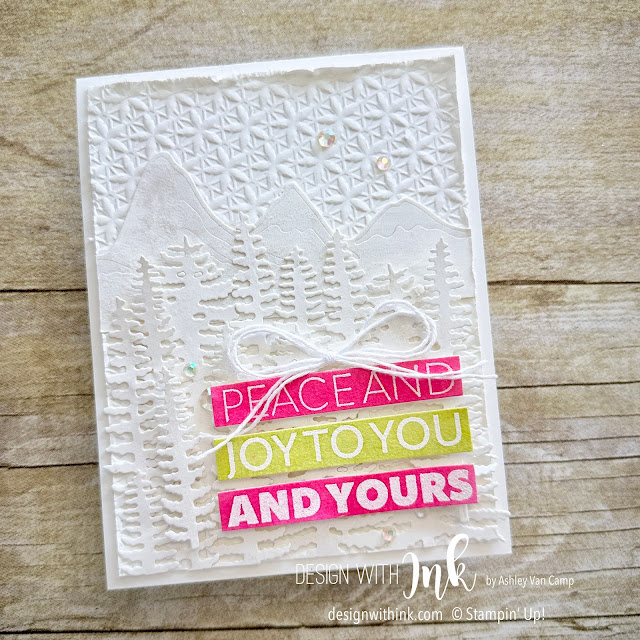
Forest-y Color Challenge Fun! for TGIF Challenge #449

Whooo!  It's a new COLOR CHALLENGE this week for TGIF Challenge #449!  Who is ready to play along?!  I maybe made a little tiny change to the colors for my card, but I will show you that after I show my card!

Colors Basic White, Melon Mambo, Granny Apple Green
Inks: Melon Mambo, Granny Apple Green, VersaMark
Cardstock/Papers: Basic White, Fluid 100 Watercolor Paper
Stamps: Joy to You
Tools:  Basics 3D Embossing Folders, Forever Forest Dies, Heat Tool
Accessories: Baker's Twine Essentials Pack, Basics Embossing Powders, Iridescent Rhinestones Basic Jewels 

Can you guess what the colors in the challenge are? Can you guess what I changed? 

Well - here you go with the challenge square!


 With White being on the actual challenge as a main color - that's where I focused for the card.  With pops of Granny Apple Green and ... well - the small change I made.  😂 Instead of doing Real Red, I used Melon Mambo.  I figured it was still in the same family color so it would work, right?  Hee.  And remember - these challenges are to be used as your inspiration.  So use it to take it where it takes you! 

Here are some pics of the details and some info on what I did:

The photo below shows how I did the greeting:

    1.  Emboss the greeting by stamping in VersaMark ink onto Fluid 100 Watercolor Paper.  Then add                White Embossing Powder & heat!  (It will be hard to see on the paper, but it's there!)

    2.  Watercolor over the greeting!  You could just watercolor each individual line.  But I chose to stamp             and emboss the greeting twice.  Then you just color over each of the greetings in your color choice.

    3. Cut the greetings into strips.

    4.  Trim and add the greeting to your card!

I love how this turned out.  It was really fun to do & I love the crisp white with the pop of color.  💗


Then I just layered all my pieces.  I started with an embossed background.  Then I just die-cut a bunch of trees  & one of the mountain pieces from the Forever Forest Dies.  I also colored over all of the mountains & trees using the Wink of Stella Glitter Brush.  (So in real life it is fun and glimmery.)   Then just layered them all together! 


I hope you enjoy this card!  And now is the fun part!  You get to head on over to the TGIF Challenge Blog and play along with us this week! I can't wait to see what you create! 

Thank you so much for visiting!  Please let me know if you have any questions or need help with anything! I would love to help you with your paper crafting needs and would love to help you get any Stampin' Up! supplies you need to get your hands on! 😃

Contact: designwithink@gmail.com